Our very own Quinn was interviewed last week on WGWX's radio show Kid's Brain talking about her experiences building her Grawmet with us.
Check it out at:
http://wgxc.org/archives/5651
Good job Quinn!
Bethany
Saturday, December 29, 2012
Wednesday, December 26, 2012
Open work day Friday 12- 27- 2012
The room will be open Noon-5:00pm for those of you who are still in town. Need help building your bot, crimping, BLS connectors, wiring or flashing your board come in. We can get you up to speed. This includes any of you reprappers who may still be having trouble.
~Brandon B.
~Brandon B.
Friday, December 21, 2012
If your brainwave's got no brains, or your board is hiding from windows.
Come in and get your boards flashed, the Brainwaves can talk to both Mac and Windows, or just come in to work on the Build.
http://printrbot.com/wp-content/uploads/2012/04/Printrbot-Getting-Started-Guide2.pdf
or the individual links:
Pronterface http://koti.kapsi.fi/~kliment/printrun/
Slic3r http://slic3r.org/
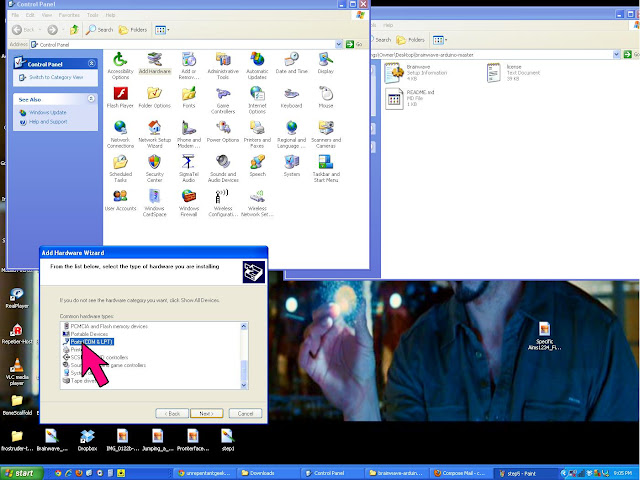
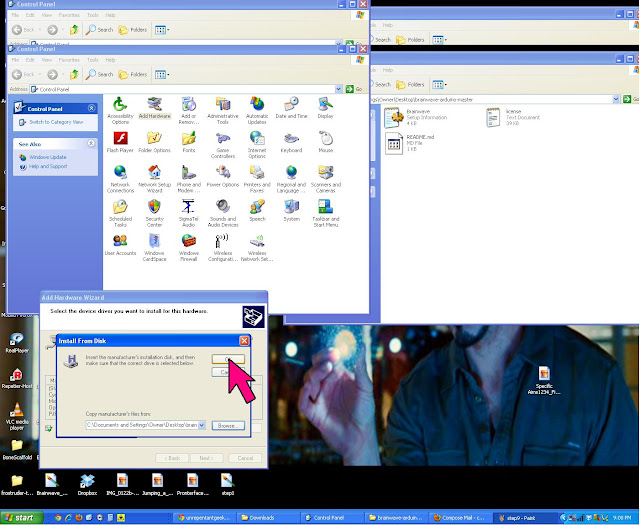
Windows COM Port .INF Walkthrough.


Open Pronterface, make sure it connect and test the bots ability to move heat, call temps and extrude.
If you are still having trouble connecting to the board via Pronterface, restart the computer and try to connect to Pronterface again. If Pronterface still can't connect, right click "My Computer" select properties and make sure to check the hardware for COM# (click properties is set to the Baudrate to 115200, sometimes it will default to something silly like 9600.

Good Luck
~Bowman
 |
| Brainwave Board Wiring Diagram |
Requirements For Mac and Windows
1) Install Arduino 1.0.2
2) install the brainwave-arduino bundle from
https://github.com/
3) Download this branch of Marlin:
https://github.com/
https://github.com/
3) Download this branch of Marlin:
https://github.com/
The brainwave folder needs to be in Arduino right click it (control click for macs) for show package contents. Store brainwave folder in the hardware folder be sure to take the Brainwave file out of the first folder it has trouble seeing out side itself.
Walkthrough (Mac & Windows)
In Ardiuno 1.0.2 set your board. Tools => Board => Brainwave (see image).
Hook the board up to the computer with the tinyUSB press program.
In Tools => serial port the board should be recognized as a COM PORT# (PC) tty.usb modem131 (Mac) select that.
In the sketch open Marlin.pde (I stored this file in firmware in the Brainwave folder so I wouldn't lose it) this will be converted to Marlin.ino afterwards
Set Motherboard to 82 (found in Configuration.h)
Click Verify sketch (check mark symbol)
If there are no error messages
Click compile (arrow symbol)
It should write the firmware directly to your board. To confirm with open Pronterface set the Baudrate: 115200 and see if you can driver the bot around. Motors should spin heaters should warm up, and temperature readings should be accurate.
Pronterface & Slicer
If you haven't installed pronterface or slicer, you will need to. Printrbot.com has the best walkthrough (link below) I strongly suggest you read through the through entire PDF to ease the calibration. (I frequently reference pages 1 and 4 for beginners)
or the individual links:
Pronterface http://koti.kapsi.fi/~kliment/printrun/
Slic3r http://slic3r.org/
Never unplug a stepper motor when the board is on, otherwise you'll get a demo of how to replace a fried driver. (I stand corrected Mr. Wilson)
If you have a PC the COM PORT will disappear after the board has been flashed with the correct firmware. In the brainwave Arduino Folder there is a Brainwave.INF file this will allow you board to talk to computer as a COM PORT.
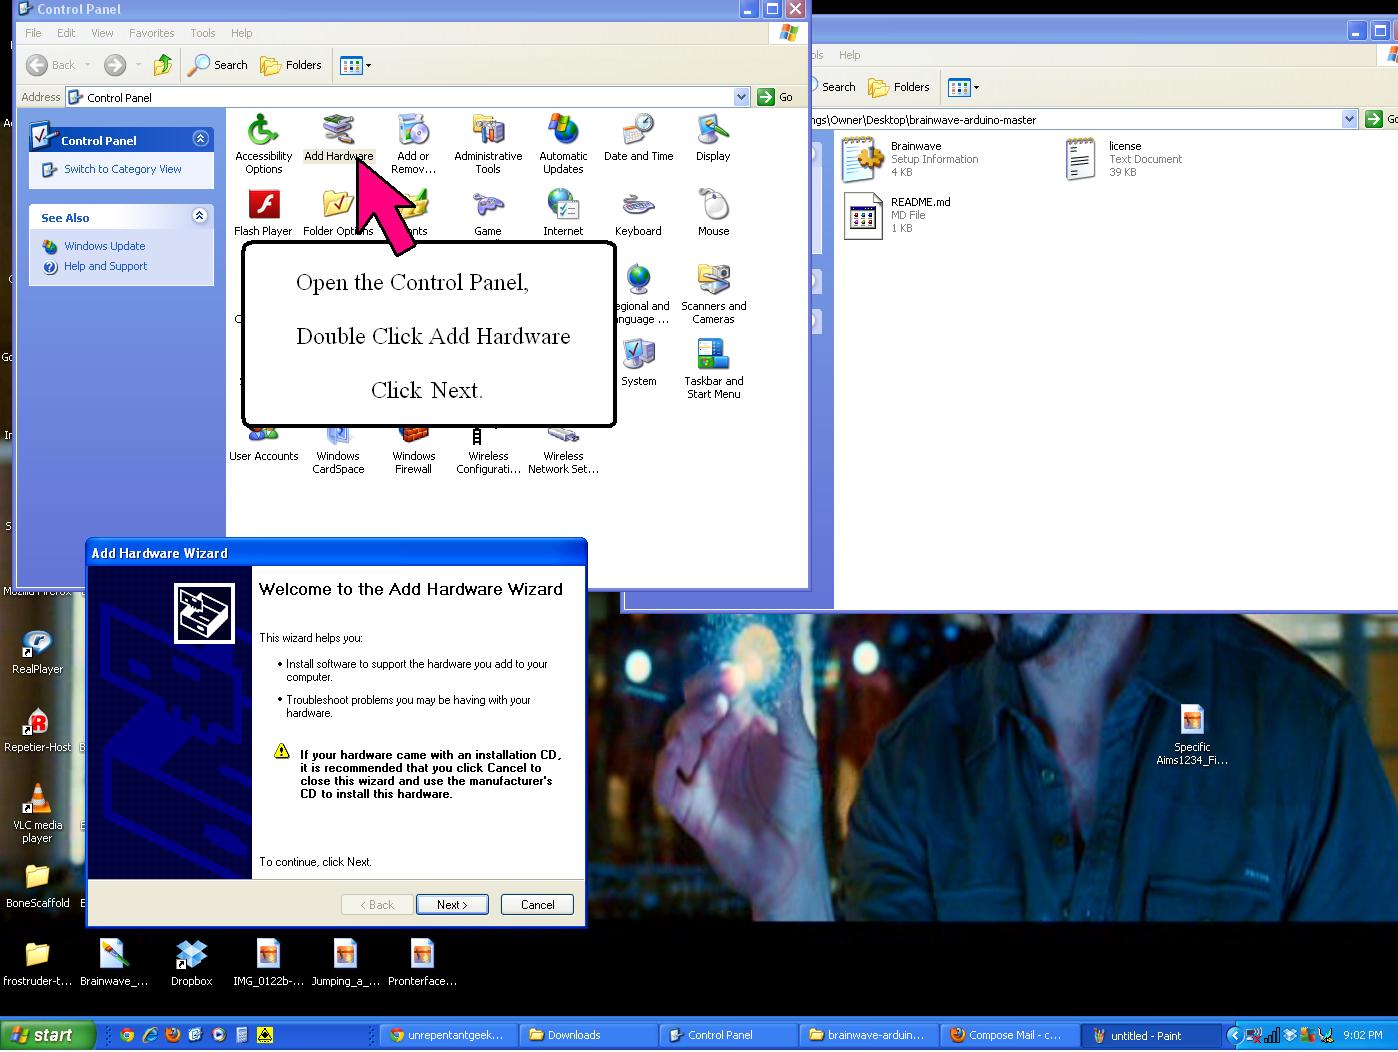
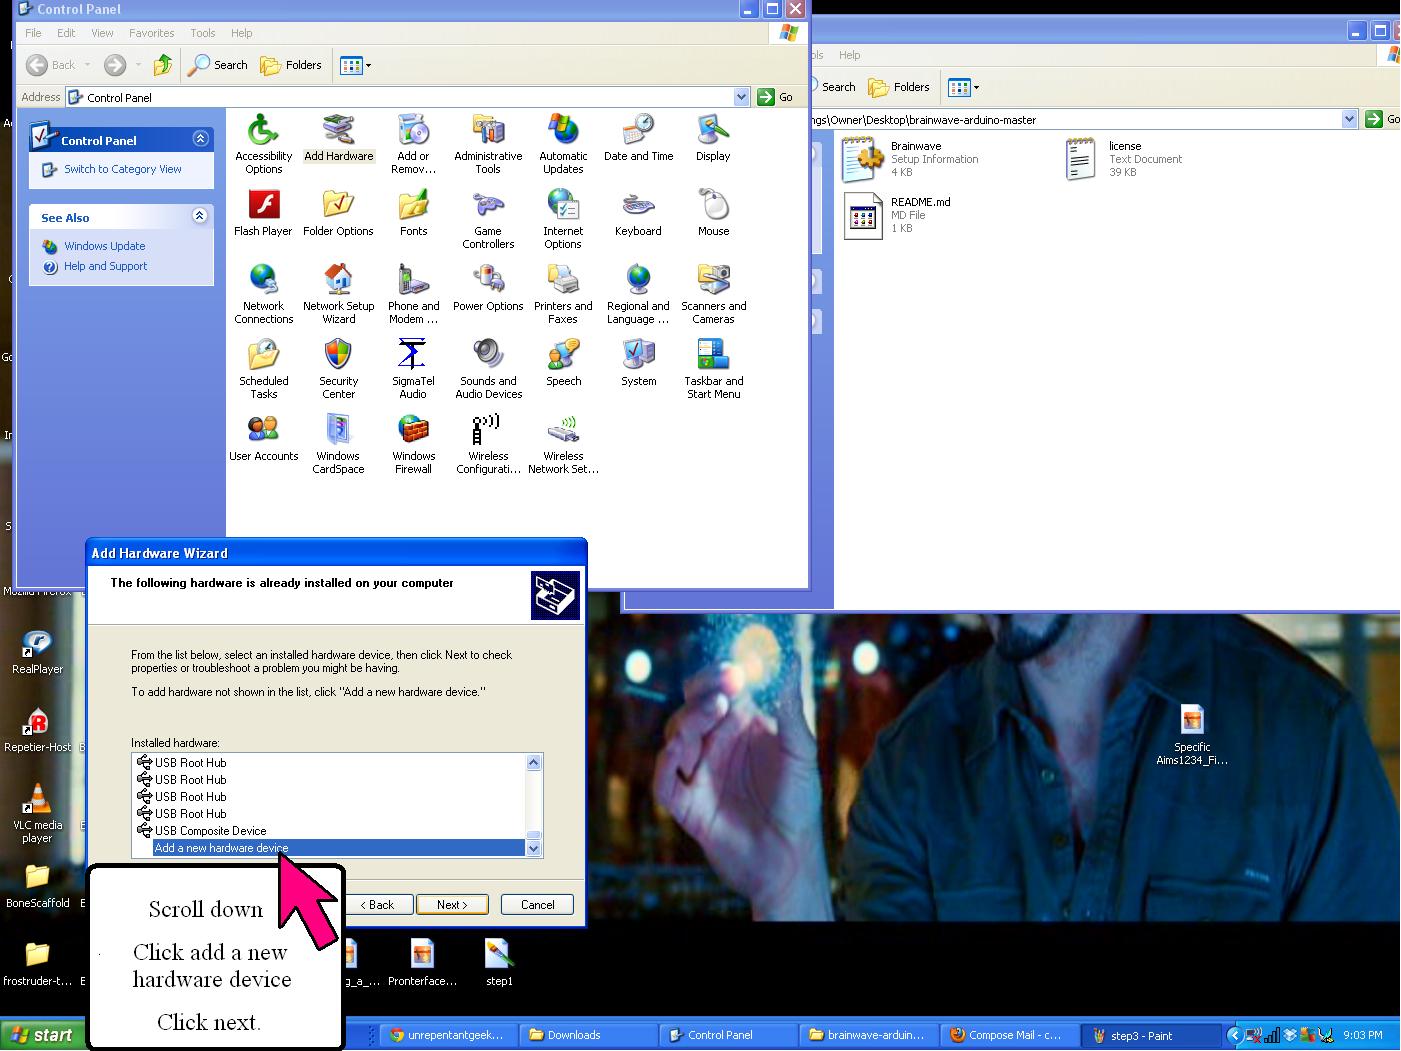
Windows COM Port .INF Walkthrough.
"How to find the Brainwave COM PORT in Windows XP (this also works for Windows 7)"


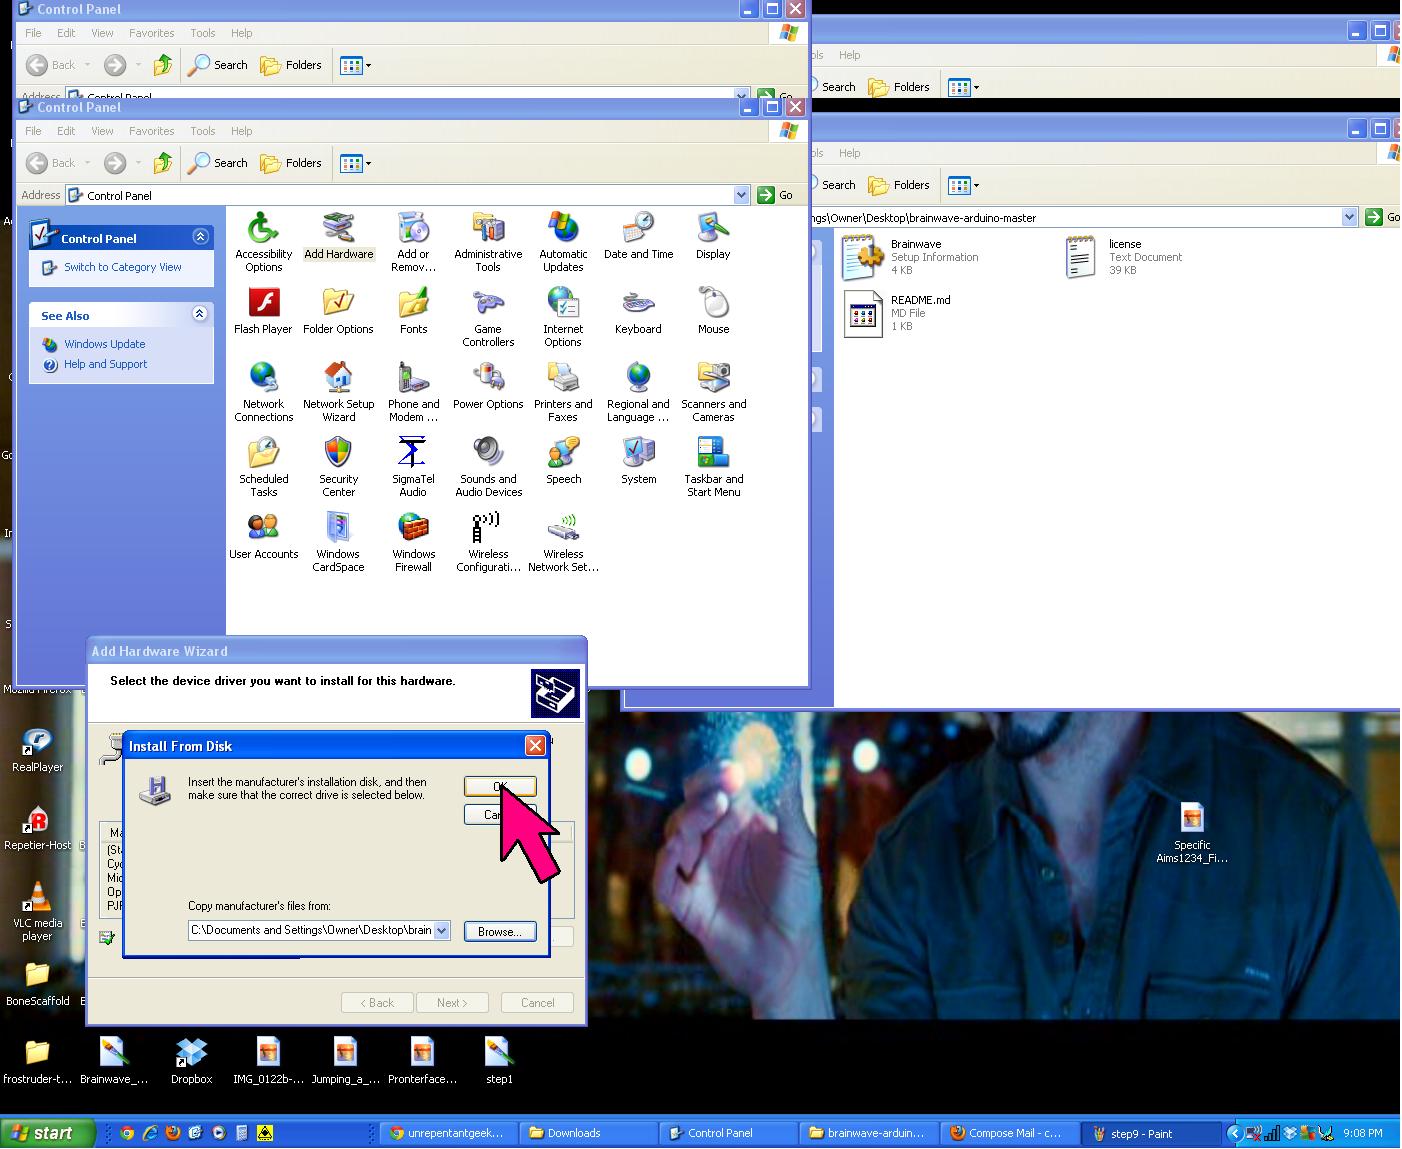


If you are still having trouble connecting to the board via Pronterface, restart the computer and try to connect to Pronterface again. If Pronterface still can't connect, right click "My Computer" select properties and make sure to check the hardware for COM# (click properties is set to the Baudrate to 115200, sometimes it will default to something silly like 9600.

Good Luck
~Bowman
Tuesday, December 18, 2012
Open Workshop this Friday (Dec 21)
Hey all,
The workshop will be open this Friday December 21: 12:00-5pm
~Bethany
The workshop will be open this Friday December 21: 12:00-5pm
~Bethany
Friday, December 14, 2012
No Open Workroom Today
This is just a reminder that there will be no open workroom hours today. So if you were planning a special trip into school just for that, stay home and enjoy some much deserved down time.
This probably doesn't affect too many of you, but it is likely that our open workshop hours will be modified for the duration of the break. As soon as the officers get that figured out we'll post it here.
Yours in Printing,
Mark
Friday, December 7, 2012
Workday Vote
The room will be open Noon to 5pm on Saturday. If you want a chance to get intensives, tutorials, troubleshooting, or unwind from studying on finals, I (Brandon B.) will be in there to help you with anything I can. Reprappers come in too if you are still having trouble.
Since I cannot be present for the build day this coming Friday, I am offering two days for builds. As always noon-5:00pm and pick a Monday or Wednesday
... and a Tuesday or Thursday.
Vote in comment section example Brandon B. Monday & Thursday.
Thursday seems to be definitive.
I will post the decision on Monday or Wednesday tonight @ 9:00pm
Ok so it is 10:30pm, and I veto Wednesday for Monday... because ,well, everyone but Ben can make it Thursday. Sorry Bing.
The WOOF room will be open for build days
Monday Dec 10th Noon -5:00pm
Thursday Dec 13th Noon -5:00pm
Hope to see your there,
~Brandon B.
Wednesday, December 5, 2012
Keep it clean, folks
With our recent influx of Grawmet orders, people have been excited to work on their 3D printers. Club members are free to use the workshop and our tools to help them with the Grawmet, Clonedel, or any other project you may have. Before one gains access to all of this, you must go through a safety briefing with one of WOOF's officers. One of the first things we go over in the briefing is cleanliness.
If you make a mess while working, you are expected to clean it up. You should always allot yourself 5-10 minutes at the end of a work session to tidy up your area. Some examples of tidying up include:
If you make a mess while working, you are expected to clean it up. You should always allot yourself 5-10 minutes at the end of a work session to tidy up your area. Some examples of tidying up include:
- Putting tools back
- Don't leave calipers, screwdrivers, etc. out on the table. Tools should be put back when you are done with the tool, not when you are done working. (This goes double for the calipers, they should be placed back into their case to avoid breaking them)
- If you take a drill bit off of the drill press or a hand drill, DO NOT place it on the table. It goes back in it's appropriate place immediately. This makes it easy to find the drill bit size that you want later. We have already lost 2-3 drill bits.
- Unplug and store power tools (This does not apply to stationary tools like the drill press). Dremels, heat guns, etc. should not be left out on the table, and should definitely not be left plugged in.
- Sweeping up shavings and trash
- If you use the sander or the drill press, please do a quick sweep at the end of your session. The dustpan should be next to the tool boxes. Otherwise, there is a huge mess at the end of the day that someone has to clean up.
- If you are using hand drills, please sweep up before you leave, or else these shavings just get in everyone else's way.
- Polyurethane dust is EXTREMELY slippery on cement floors, so, for safety's sake, don't just push your mess onto the ground. Always use a dustpan.
- Storing your items appropriately
- Once your Grawmet is assembled enough to not fit in your kit box, it should be stored out of the way. One great way to store your Grawmet is to rent a locker out in the hallway. It is totally secure, and you'll have access to it even if the workroom is closed and locked
Our workroom is often treated with surprise visits from faculty members, students, and many others. We would much rather everyone see a nice clean room full of 3D printers, rather than a dirty one. Please remember to clean up!
Friday, November 30, 2012
Some Contests UW WOOFers Might Be Interested In
International Symposium on Green Manufacturing and Applications (ISGMA 2013)
Call for Abstract
International Symposium on Green Manufacturing and Applications (ISGMA 2013)
June 25(Tue)~29(Sat), 2013
Sheraton Waikiki Hotel, Hawaii, USA (http://www.isgma.org)
~~~~~~~~
The UW's Environmental Innovation Challenge
Call for Abstract
International Symposium on Green Manufacturing and Applications (ISGMA 2013)
June 25(Tue)~29(Sat), 2013
Sheraton Waikiki Hotel, Hawaii, USA (http://www.isgma.org)
The International Symposium on Green Manufacturing and Applications 2013 will be held at Sheraton Waikiki Hotel, (http://www.sheraton-waikiki.
Topics and Scope
The topics of ISGMA 2013 cover all aspects of green manufacturing and applications including the areas listed below.
Topics and Scope
The topics of ISGMA 2013 cover all aspects of green manufacturing and applications including the areas listed below.
• Design & Manufacturing
- Machinery / Aerospace / Electronics / Plant / Robot / EV / Hybrid Car
- CAD / CAE / CAM / PLM / SCM / Optimization / Reverse Engineering
- Appropriate Technology / QoLT / Medical Technology / Bio Technology
- Reliability Analysis / PHM / Faulty Diagnostics and Prognostics
• Energy Saving & Waste Reduction
- Machining / Forming / Grinding / Casting / Forging / Molding / Joining
- Micro · Nano / Laser / Energy-beam / Printed Electronics
- 3D Printing / RP&M / R2R / Electro-chemical / Non-traditional
- Re-manufacturing / Recycle / MQL
• New · Renewable Energy
- Solar / Wind / Bio / Hydrogen Energy / Fuel Cell
- Energy Harvest / Storage / Conversion / Recovery
• Light · Eco-friendly Material & Structure
- Natural / Bio-inspired / Light-weight / Flexible / Powder / Multifunctional
- Metals / Ceramics / Polymers / Composites / FGM / Graphene
- Smart Material & Structure / Photonic / Display
• Energy · Environment Management and Policy
- Green Factory / Strategy / Policy
- LCA / Environmental Impact Assessment
- Smart Grid / IT Applications / Energy Monitoring
Important Dates of Submission
• Abstract Submission: December 31, 2012
• Acceptance Notification: February 28, 2013
• Early Registration: April 1, 2013
• Full Paper Submission (optional): April 30, 2013
~~~~~~~~
The UW's Environmental Innovation Challenge
Prototype funding Application: https://catalyst.uw.edu/webq/
DUE
December 16, 2012
Cleantech Innovation + Market Opportunity = Solutions for the Planet
The University of Washington has a challenge for you. If you have a
passion for clean technology, the smarts to play in the emerging “green
economy,” and desire to make an impact, the UW Environmental Innovation
Challenge is your opportunity... and chance to win $10,000. The UW Environmental Innovation Challenge is on April 4, 2013.In the UW EIC, interdisciplinary student teams define an environmental problem, design and develop the solution, and produce both a prototype (proof of concept/computer simulation) and business summary that demonstrates the market opportunity. Teams are judged - by Seattle-area industry cleantech experts, entrepreneurs, and cleantech investors - on their prototypes(or computor simulations), pitches and business summaries, plus the potential impact of their innovation. Can your idea reduce environmental impacts, improve ecological sustainability, conserve resources and compete in the marketplace? Prove it.
Innovations in Clean Technology – Fall Practicum
Unique interdisciplinary course focuses on innovative cleantech solutions to our most pressing environmental challenges and turning those innovations into exciting businesses to bring them to market. Topics include alternative and renewable energy and energy efficiencies, green building, and transportation.
The Center for Innovation and Entrepreneurship produces the UW Environmental Innovation Challenge in partnership with the College of Engineering and the College of the Environment.
~~~~~~~~~~~~~~
Primary Care: Medical Technology
We
want to call your attention to the upcoming fifth annual
round of this exciting award competition for engineering
students, nation-wide. This generous Prize, sponsored
by a private donor and administered by the MGH and
CIMIT, is designed to reward technology innovations
directed at clinically important needs in Primary
Healthcare. The top three student teams will receive
$150,000, $100,000 and $50,000, respectively!
We
would greatly appreciate your help in promulgating news
of this opportunity to your engineering department
chairs, as this may be of intense interest to graduate
or undergraduate students in any engineering department
or bioengineering program.
Details
of the award can be at
www.primarycareprize.org.
A Prize flyer is available at
http://cimit.org/images/
The
first step for an entrant is the generation of a
two-page preliminary description by January 21th,
2013. From those, ten Finalists will be chosen, and
each of those will receive $10,000 to use in
their work toward the full final entry due in June. The
three major winners will then be chosen and the funds
disbursed to their institutions for stewardship.
The
entry criteria for this major prize will simply require
the students to obtain an "Institutional Letter of
Support" from a Department Head, business official or
Dean. We wanted to alert you to that administrative
requirement, and assure you that all that is required is
verification on letterhead that the student entrant is
indeed a student in good standing and that if he/she
wins, that the school will accept the money on behalf of
support of the student's work on the project going
forward. We simply need stewardship of the student’s
winnings as a gift to the school for the expenses of
supporting the project. The winning student(s) may then
draw on the funds for any project-relevant purpose.
Thank
you for your attention and help in distributing this
announcement to bioengineering Faculty for their
students’ use.
Yours
truly,
Ronald
Newbower, PhD
Co-founder,
CIMIT
Strategic
Advisor, Massachusetts General Hospital, Ambulatory
Practice of the Future~~~~~~~~~~~~~~~~~~~~~~
Good luck!
Bethany
Grawmet Parts Diagram
Some of you are looking at your Grawmet cast parts and aren't sure what everything is called. Here is a picture with parts labeled. Edit: Improved image courtesy of Dharma. Thanks Dharma.

| Our start to documentation can also be found at https://github.com/WOOF3D/ |

Tuesday, November 27, 2012
Great News for Grawmet Builders
To all WOOFers who ordered Grawmet kits,
The parts are finally in! Over the next few days Brandon Bowman and I will be preparing the parts (cutting rods and so forth). This means the completed kits will be ready for you on Friday at noon.
This week's open workroom hours are devoted to assembling Grawmets. If you can make it come in and get started. It is entirely conceivable that you will have a printer working before finals week! Depending on your experience/familiarity with this type of project, expect full assembly to take a minimum of 2 hours and upwards of 6 in the workroom before you start the testing/calibration phase. There are a lot of variables that will affect this time though. Brandon and I will both be on hand to help wherever we are needed.
Things you may want to bring with you:
I don't think anyone has slipped through the cracks, but if there are any of you who have paid for your Grawmet but not been through the safety briefing please contact me so we can get that taken care of.
I appreciate those of you that have shown patience as the parts have been shipping. In exchange for your patience you have the assurance that you're receiving good parts without over-spending or going through the headache of sourcing parts individually.
I hope to see you all on Friday. Until then, don't forget to be awesome.
-Mark Hanson
The parts are finally in! Over the next few days Brandon Bowman and I will be preparing the parts (cutting rods and so forth). This means the completed kits will be ready for you on Friday at noon.
This week's open workroom hours are devoted to assembling Grawmets. If you can make it come in and get started. It is entirely conceivable that you will have a printer working before finals week! Depending on your experience/familiarity with this type of project, expect full assembly to take a minimum of 2 hours and upwards of 6 in the workroom before you start the testing/calibration phase. There are a lot of variables that will affect this time though. Brandon and I will both be on hand to help wherever we are needed.
Things you may want to bring with you:
- Your enthusiasm. This will be fun!
- Your laptop for testing your electronics if you think you'll get to the testing phase. Because we have a limited number of power outlets in the room you should fully charge your laptop's battery before you show up. If you don't have a laptop I'm sure someone in the room will be willing to let you plug in your printer to theirs.
- Safety glasses if you don't like using community safety glasses.
- A few hand tools if you have them. The group has all the tools to complete the build but if you bring in your own it means less waiting for the guy next to you to finish using the tool that you need. The only hand tools you need are hex keys (all the bolts use 2.5mm, 2 mm, and 1.5mm hex keys), something to hold nuts with (like a small adjustable wrench or small pliers), and wire crimpers.
 |
| The three tools I used most in assembly: small needle-nose pliers, 2.5mm hex key, and wire crimper. |
I don't think anyone has slipped through the cracks, but if there are any of you who have paid for your Grawmet but not been through the safety briefing please contact me so we can get that taken care of.
I appreciate those of you that have shown patience as the parts have been shipping. In exchange for your patience you have the assurance that you're receiving good parts without over-spending or going through the headache of sourcing parts individually.
I hope to see you all on Friday. Until then, don't forget to be awesome.
-Mark Hanson
Saturday, November 24, 2012
Clean-up
Hey Workroom Users,
We need to get better about cleaning up after using the workroom. If you don't know where something goes, ask someone. We need to keep the tables clear so that other members can use the space.
Those who are dressing their Grawmet parts: don't forget to sweep up after using the sander or dremel. I'm finding purple dust everywhere these days.
If you have any ideas of how we can best keep the workroom clean, please let me know.
Cheers,
Bethany
Wednesday, November 21, 2012
Thanksgiving Break - Workroom
Brandon B is willing to hold a Open Workshop this Friday (Nov 23) if we get at least 10 interested members. So if you want to come in and work on Friday leave a comment to this post with your name. If you see 10 names by Friday 8am, you'll know that the room will be open.
Have a great looooooooooong weekend,
Bethany
Have a great looooooooooong weekend,
Bethany
Wednesday, November 14, 2012
Just Getting Started?
Are you a 3D Print-Beginner? Need some help understanding what 3D printing is, can do, how to do it yourself?
Check out Jason Webb's "3D printing: quick start guide"
http://www.thingiverse.com/thing:34485
Check out Jason Webb's "3D printing: quick start guide"
http://www.thingiverse.com/thing:34485
Make Mag. Meet up @ Metrix Create Space
Calling all Makers, Make Magazine is having a Maker event at Metrix Create Space again this year.
More details on the Metrix Create Space FB page. This Thursday @ 6 pm and it's free.
.... M
More details on the Metrix Create Space FB page. This Thursday @ 6 pm and it's free.
.... M
Tuesday, November 6, 2012
Nov 6 Meeting: ME 495 & Such
Hey Fabbers,
In case you had to miss the meeting today, here's a quick summary
1) Large frame printer
2) Sand printer
3) Molten glass printer (requires some time off campus at a glass studio in Ballard)
Those interested are asked to pick up a ME 495/ME 499/ME 498 Permission Request form from the ME front office (they are located in a spinning tower of forms by the mail room)
Fill out the form and post it to Professor Ganter's pegboard outside his office on the third floor. Please also e-mail him that you've done so.
Also feel free to e-mail him or myself (Bethany) if you have any questions.
If you plan to graduate Winter Qtr or need ME 495 offered that quarter for any other reason, let Professor Ganter or myself know.
Professor Ganter is also offering a DIFFERENT ME 498 called Advanced Rapid Prototyping. So if you are interested in working with the Zcorp powder printers or Stratasys take his course Winter.
If you are interested in getting in contact with him (and don't know how) send me (Bethany) an e-mail and I'll get you two connected.
Keep Fab-ing,
Bethany
In case you had to miss the meeting today, here's a quick summary
ME 495/ ME 499
Winter 2013, Professor Ganter will be offering the ME 499 option (1-2 cr) of Spring 2013's ME 495's projects. There is a choice of three projects:1) Large frame printer
2) Sand printer
3) Molten glass printer (requires some time off campus at a glass studio in Ballard)
Those interested are asked to pick up a ME 495/ME 499/ME 498 Permission Request form from the ME front office (they are located in a spinning tower of forms by the mail room)
Fill out the form and post it to Professor Ganter's pegboard outside his office on the third floor. Please also e-mail him that you've done so.
Also feel free to e-mail him or myself (Bethany) if you have any questions.
If you plan to graduate Winter Qtr or need ME 495 offered that quarter for any other reason, let Professor Ganter or myself know.
Other Winter Course Offerings
Professor Storti is also offering a ME 498 called Voxel Modeling Winter Quarter. It is at the permission of the instructor, so if you are interested in using Voxel Modeling to develop a smooth surface, send him and Margo Segimoto an e-mail.Professor Ganter is also offering a DIFFERENT ME 498 called Advanced Rapid Prototyping. So if you are interested in working with the Zcorp powder printers or Stratasys take his course Winter.
3D4D Challenge Win
For those who have been curious: Matt, Brandon, and myself needed some time to figure out how the 3D4D Challenge Win was going to affect WOOF. In short, the company that is being created is a separate entity. We are still your fellow members and deeply committed to the WOOF cause of helping members out with their own printers, improving and expanding current 3D printing technology, and just generally spreading awareness of the capabilities of 3D printing. We three will be using part of the winnings to help fund some of WOOF's projects and look forward to working along side everyone on open-source projects.WOOF's Constitution and Charter
I have created two new pages on our blog: one with the Constitution required by UW SAO in order to get an RSO status, the other with WOOF's actual structural Charter. The Charter is still under construction and I am constantly looking for people to fill vacancies. Feel free to read through either and give me feedback on anything.Printing in PLA?
Do you have a printer up and running? Want to help out a fellow WOOF member on an awesome project involving: microwaves, molten metal, and 3D printing? Corwin is looking for some assistance in his research into lost-PLA casting with his microwave furnace.If you are interested in getting in contact with him (and don't know how) send me (Bethany) an e-mail and I'll get you two connected.
Keep Fab-ing,
Bethany
Thursday, November 1, 2012
All Member Meeting
Hey Fabbers!
Professors Ganter and Storti are calling an all group meeting to discuss how the 3D4D winning affects or does not affect the WOOF group AND to talk about the ME 495/Me 498 that will be offered next Winter and Spring quarters.
Day: Tuesday Nov 6 - Voting Day
Time: 3:30 - 4:30
Place: ME 252
I hope to see you there!
Bethany
Monday, October 22, 2012
WOOF has won the 3D4D Challenge!
Last week, as you may know if you've been keeping up with the blog, WOOF officers Bethany Weeks, Matt Rogge, and Brandon Bowman journeyed to London to attend the finals of the 3D4D Challenge. On Friday, October 19th, they, along with the 6 other finalists, gave presentations on their proposals to a panel of judges. These presentations were streamed at 9:00 AM, PST. The results were supposed to show up at 1:00 PM, PST, so the club workroom was abound with excitement as the hour drew near. 1:00 came... and went! By 1:30, we had all decided that the judges must have had a hard decision on their plate. We went about our business, disappointed but still hopeful.
And that hope was not unfounded! At nearly 9:00 PM, PST, word started getting around that WOOF had won the 3D4D challenge! Tweets by the 3D4D panel themselves made it official. You can check out the official announcement at the link below:
This is just the story from our side of the pond... Once our beloved officers come back to the states (and get caught up on school), we will hopefully have even more stories to share. But for now, enjoy these two pictures from the event.
This is an exciting first step in a new direction for WOOF! Huge thanks to the 3D4D challenge and its sponsors for making this all possible!
 |
| The Finalists (minus Boris) and William Hoyle - Picture taken by Rosie |
 |
| The 3D Printed Trophy |
This is an exciting first step in a new direction for WOOF! Huge thanks to the 3D4D challenge and its sponsors for making this all possible!
Friday, October 19, 2012
How to Get Your Own Printer!
To all WOOFers,
It's the time many of you have been waiting for. I have priced out parts for the Grawmet. By doing a group order we can get the price down to $300. This gets you a box with all the parts inside ready to be assembled. The box will even have your name on it so you'll know it's yours.
Because we want to get rocking and rolling soon I must have the money by 5:00 pm on Friday (26 OCT). Cash or check is fine. The sooner you have your money turned in the better! I am trying to negotiate bulk discounts with the vendors and if I can specify how large our order will be then I have more leverage to save us more money. If I am able to save us a significant amount through bulk discounts then you guys get the savings returned to you. I hope that's incentive!
Next week if I'm on campus and not in class I will be in the work room with the door open. Come in and turn in your money. I'm the only one who will be taking money for this. Kits will be assembled on a first paid, first served basis. So if your money is in first thing Monday you will be in the first wave of kits. If you wait until last thing on Friday, you could potentially wait a while if there are problems (like back orders and the like). I hope that's even more incentive to get your money in soon.
If you won't have the money turned in until later in the week, but know for certain that you will be joining the order please email me so I get a more accurate count of how many people will be participating in the order. To be clear: that doesn't get you in the order queue any earlier. It just helps me as I negotiate with vendors for price breaks. You will be placed in the order queue when your money is turned in.
If for some reason you are unable to muster up the $300 by Friday we will host other group orders in the future that you should be able to get in on.
If there are any questions please feel free to email me. Put the subject [Grawmet Order] in the subject line so I can identify it right away. My email is ORLROGC@gmail.com. I look forward to facilitating this group order. And as always: don't forget to be awesome.
-Mark Hanson
WOOF Treasurer
Today's Open Workshop
Hi All,
Today we will be hosting Open Workshop as usual but it will not begin until 12:20. With half of our officers across the pond, no one will be available to open the room until then.
For those of you itching to get your printers built there is good news: we will be accepting payments next week and placing orders. I have a few variables to pin down but it looks like our initial estimate of $300 was pretty darn accurate. I'll put a post on this blog when we are officially taking orders.
It's been brought to my attention that some of you who are still building Clonedels are missing some of the resin parts. I've helped a few individuals already, but I'm sure there are more. If you're missing anything drop by between 12:20 and 5 and I can get you what you need. If we don't have the part you're missing in the pile of spares I'll be sure to cast it this weekend and get it to you ASAP. If you're not sure if you're missing anything bring your printer in (or pictures of your printer) and I'll be able to tell you if you've got everything.
Don't forget to be awesome,
Mark
Wednesday, October 17, 2012
With love, From London Town
Hello Fabbers,
This is Bethany and I am in London with Brandon B and Matt for the 3D4D Challenge:
http://www.3d4dchallenge.org/
Our proposal centers around Oaxaca, Mexico where we plan to bring our large printer, filament extruder, shredder, and some desktop printers. We plan to start out by printing composting latrines and rainwater collection system components to aid Water for Human's design to provide good sanitation and clean drinking water to the locals.
There will be live stream of the presentations Friday at 5pm BST at:
http://3dprintshow.com/3d4d-
Cheers,
Bethany Weeks
Edit from Mark:
I just did the math. The live stream is at 9am local time. I encourage you to watch and cheer our group on from across the world!
Thursday, October 11, 2012
Tomorrow's Open Lab
Hi all,
This is a reminder that this Friday (12 OCT) we have a special workshop about 3D printing basics. It starts at noonish. Those of you who are just getting into 3DP will get the most out of this presentation.
We're also interested in finding out what else you guys want to know about. This workshop is first of hopefully several. Drop on by to the workroom and let us know what else you want to know about and if there's enough interest we'll make it happen!
If you have a particular project you want to be a part of (metal printing / 3D copier / filament extruder / etc) you may want to swing by and find like minded individuals to begin forming project groups. You may even officially form the groups and get the ball rolling.
If you have not attended a safety briefing yet you can do a make-up, but it won't be until after the presentation.
Hope to see you Friday!
Saturday, September 22, 2012
Autumn WOOF Events
Hello Fabbers!
The school year starts again on Monday and WOOF has a line-up of events for you all.
What: Dawg Days' Student Activities Fair
When: Tuesday Sept 25 & Wednesday Sept 26
Time: 10 am - 3 pm
Where: HUB Ballroom
We will have a booth (and a running printer) at the Student Activities Office's Student Activities Fair. Stop on by and say "Hi" or to get a quick run down on what we have planned for this next year. This is a great time to meet the officers of WOOF and hear more about what WOOF is all about.
More information about the Student Activities Fair can be found here:
http://depts.washington.edu/sao/programs/student-activities-fair/
What: General Club Meeting
When: Tuesday Oct 2
Time: 4:00 pm
Where: MEB 238
We will be holding our first general club meeting to inform members and wannabe members on our specific plans for this next year. This is your main opportunity to become a club member for this next school year. Membership dues are $20 for this year's membership and are due upon submission of our "application".
What: Open Workshop
When: Fridays
Time: Noon - 5pm
Where: Club Room MEB 252
We are going to continue holding a general Open Workshop on Fridays for members who have started building their printers but haven't finished them yet and need a little help. The Open Workshop is also a great time to come in and help work on our various large group projects like Big Red.
I hope to see you at these events!
Bethany - Director of Operations
Monday, September 17, 2012
Big Red's Z-axis is fixed!
You heard it here first, folks! We've got the z-axis of Big Red working as well as it ever will! We now have smooth, continuous motion that can be calculated to any distance. This is going to make printing with Big Red so much easier and faster.
We even have a video on the movement:
Click here for the video!
As for details on how we did it:
We discovered that our encoder pulses per inch (Stuff that scales the movement) was off 100,000 on the Z axis. The original scale was 1,310,000, and the new scale is 1,200,000. This new scale is calculated with DynaTorch's built in utility, and accounts for the gear ratio of 60 and the lead of .1. (Don't worry if you don't know what that means, this is mostly for reference. These values come from our lead screw and universal gearbox, and are unlikely to change)
This change allowed us to move the motor more than 2000 pulses with the SmartMotor Commands. The old M81 command was "D=2000 G TWAIT", copy and pasted many times. The new (now M80) command is "D=519480 G TWAIT". The M81 command had to be looped 18 times, causing a stuttery motion. The new command is smooth as silk. And just in time for the new school year!
See you all soon!
Friday, September 7, 2012
Club Plastic Order
Hey Fabbers,
Hope your break has been as awesome as mine. There has been some interest in making a group order of plastic. As this year's Chief Materials Officer it's my job to take orders from anyone who wants to join the group order, collect funds, and distribute supplies when they arrive. I am waiting to hear back from our supplier with specifics but this is roughly what it stands at right now:
Email me directly with how much plastic you want to purchase and your color preference(s). If you are die-hard on a particular color but nobody else wants that color then you'll have to purchase the whole 10 lb. If, however, you want to split a color with someone else (say two of you want yellow) then coordinate between yourselves and let me know that you and another person are splitting the color (again, the total between the two of you must be at least 10 lb). If you want less than 10 lb then I cannot promise a color, but will try to satisfy preferences. And if you really have no preference of color you should note that too. Currently I have heard of interest in black, purple, and green.
My email address is orlrogc@gmail.com. Please email me by Monday, Sept. 10 or earlier so I can check availability with the company. Put in the subject line "WOOF September 2012 ABS Order - your name" to make things easier to track. . Each email I receive will serve as the "official" order form so I should receive an email from each person who wants some plastic (even if all you're doing is splitting a color with someone else) and the quantities/colors should be clear. For group orders it is important that we keep thorough, clear records.
Bring your funds in to MEB 252 Next Friday, Sept. 14. I will place the order at 4pm.
In the future hopefully we will have enough club funds to maintain a club supply of plastic and we won't have to do it this way, but for now this is the only way I see it working. Don't forget to be awesome!
Yours in printing,
Mark Hanson
Hope your break has been as awesome as mine. There has been some interest in making a group order of plastic. As this year's Chief Materials Officer it's my job to take orders from anyone who wants to join the group order, collect funds, and distribute supplies when they arrive. I am waiting to hear back from our supplier with specifics but this is roughly what it stands at right now:
- 3 mm ABS.
- Standard colors are available.
- Cost including shipping should be about $12/lb ($10/lb for black and natural).
- We must fulfill a 10 lb minimum of any color we order.
This how I envision it working:
My email address is orlrogc@gmail.com. Please email me by Monday, Sept. 10 or earlier so I can check availability with the company. Put in the subject line "WOOF September 2012 ABS Order - your name" to make things easier to track. . Each email I receive will serve as the "official" order form so I should receive an email from each person who wants some plastic (even if all you're doing is splitting a color with someone else) and the quantities/colors should be clear. For group orders it is important that we keep thorough, clear records.
Bring your funds in to MEB 252 Next Friday, Sept. 14. I will place the order at 4pm.
In the future hopefully we will have enough club funds to maintain a club supply of plastic and we won't have to do it this way, but for now this is the only way I see it working. Don't forget to be awesome!
Yours in printing,
Mark Hanson
Thursday, August 23, 2012
Workshop Hours
Summer Quarter has ended and UW is officially on break. However, WOOF is still going. We are going to continue holding our Friday hours until the beginning of Autumn quarter. You should come in and take advantage of these hours as we cannot guarantee we will have access to our lovely room in the next school year.
We know there are still many of you out there with half-built Clonedels - We can help you finish them.
We hope to see you there!
We know there are still many of you out there with half-built Clonedels - We can help you finish them.
Summer Break Hours
When: Fridays 11am - 5pm
Room: ME 252 (mechanical engineering building)
We hope to see you there!
Friday, August 17, 2012
Room Open Today 8/17
Hey all,
Just a reminder today (Fri Aug 17) the WOOF room ME 252 is open at our general Friday hours 11am - 5pm
Come on down and see us. We can provide help and support for your bot building!
Just a reminder today (Fri Aug 17) the WOOF room ME 252 is open at our general Friday hours 11am - 5pm
Come on down and see us. We can provide help and support for your bot building!
Friday, August 10, 2012
WOOF Open Today 2-5pm
The WOOF room is open today from 2 - 5pm in ME 252
Tutorials and intensives are welcome.
If you need lots of help come in and we will get you up and running.
Wednesday, August 8, 2012
Shortened WOOF Hours This Week
Our regular Friday hours are shortened to 2pm - 5pm this week (8/10) due to member commitments.
Sorry to disappoint,
Beth
Sorry to disappoint,
Beth
Friday, August 3, 2012
WOOF gets Vistors
So today WOOF got to host a mini-fieldtrip for the summer robotics camp kids. They've been diligently making different kinds of robots all summer and came next door to check out our robots as their last hurrah of camp.
Brandon B set up the frostruder and demoed its ability to make tasty tasty cookie gears.
Brandon P showed the kids how Big Red can act like a giant over powered ink printer.
Beth showed them the boat and explained how 3D printers work using the boat's very visible layers of plastic as a visual.
All in all, a fun way to spend Friday afternoon and we at WOOF hope that we inspired at least some of them to keep pursuing STEM topics - especially 3D printing -

Brandon B explaining the Frostruder
Sunday, July 22, 2012
Short Update
Workroom, ME 252, is now open Fridays 11 am - 5 pm for anyone who wants to come in and work on their printers.
We are also working on a few ideas for new, large group projects, and will keep you updated as to what sorts of help we'll need from anyone who is interested.I also wanted to share with you a 45 sec video of Matt crossing the finish line at the Derby for those who haven't seen it.
Video Courtesy of Lisa Weeks
Tuesday, July 17, 2012
One Week Hiatus
Hey all,
We appreciate all your support. We had a great time this weekend. However, we are exhausted so no workshops scheduled this week. Keep checking back here though, this is where we'll let you all know what our next plans are.
We appreciate all your support. We had a great time this weekend. However, we are exhausted so no workshops scheduled this week. Keep checking back here though, this is where we'll let you all know what our next plans are.
Saturday, July 14, 2012
Seafair and Pictures
Hey all,
We want to see those pictures and videos you took of WOOF at Seafair. Sadly, we haven't set up a way to upload anything just yet if you aren't a WOOFer. So feel free to e-mail me files or post as a comment a link to those beautiful images we know you have.
Also until I figure out a better place to collect all of our silly pictures on the website, while maintaining a sense of dignity, you can check out my pictures here:
http://www.flickr.com/photos/washuugenius/sets/72157630047944536/
Thanks again!
Beth
washuu@uw.edu
RACE DAY!
Come out and show your support.
We are across from the Radio Disney booth at Greenlake. Our scheduled race time is 12:30 and again at 1:15.
We had some issues at the beginning as the Seafair crew didn't know how to categorize our very unique boat. However, we worked things out and got to race in the Adult 14+ Racing category and placed an unofficial 2nd! So way to go WOOF.
I want to thank everyone who came down to see us. We had a ball. I also want to personally thank our wonderful WOOF volunteers: Matt, Adam, Brandon B, Brandon P, Mark, Chris, and Morgan for coming down and helping show the public what WOOF is about.
Finally, Thank You Seafair. We threw you a curveball and we appreciated you working with us and allowing us to go out and play and show the public a new form of recycling. We hope to see you next year with an even better boat (and hopefully see some great competition in this new field)
~Beth
We are across from the Radio Disney booth at Greenlake. Our scheduled race time is 12:30 and again at 1:15.
Update
We did it and had a wonderful time at the Seafair Milk Carton Derby today. |
| After finishing 2nd - photo by Alicia |
I want to thank everyone who came down to see us. We had a ball. I also want to personally thank our wonderful WOOF volunteers: Matt, Adam, Brandon B, Brandon P, Mark, Chris, and Morgan for coming down and helping show the public what WOOF is about.
Finally, Thank You Seafair. We threw you a curveball and we appreciated you working with us and allowing us to go out and play and show the public a new form of recycling. We hope to see you next year with an even better boat (and hopefully see some great competition in this new field)
~Beth
Friday, July 13, 2012
Seafair Milk Carton Derby
We did it! We printed a full-sized boat on Big Red and it floats! With our trusty President at the helm, we can't lose tomorrow. Congratulations to you all for your hard work. We really couldn't have done it without you. A special thanks to: Matt, Adam, Brandon B, Brandon P, Mark H, and Morgan for sucking it up and printing every night this week from 9pm until 6am. WOOF thanks you guys for your hard hard work.
WOOF would also like to thank Scrapblasters for their assistance in reducing our milk jugs to something that we could actually get down a hopper.
They do fantastic work, check them out: http://scrapblasters.com/

The Derby activities are based out of the area around the Seattle Canoe & Kayak Club (the stadium area) at the south end of Greenlake. We are hoping to set up in a green space slightly to the Northwest of there. We are going to have a small spot set up with our poster, the Wee WOOF (our test printed boat), and general information about WOOF. Drop on by, we'd love to see you there.
Woofers,
Tomorrow please wear UW or 3D printing/Fabrication/Hacking related gear tomorrow.
WOOF would also like to thank Scrapblasters for their assistance in reducing our milk jugs to something that we could actually get down a hopper.
They do fantastic work, check them out: http://scrapblasters.com/
Tomorrow, we show them all.

The Derby activities are based out of the area around the Seattle Canoe & Kayak Club (the stadium area) at the south end of Greenlake. We are hoping to set up in a green space slightly to the Northwest of there. We are going to have a small spot set up with our poster, the Wee WOOF (our test printed boat), and general information about WOOF. Drop on by, we'd love to see you there.
Woofers,
Tomorrow please wear UW or 3D printing/Fabrication/Hacking related gear tomorrow.
Thursday, July 12, 2012
Calling All WOOFers
Hey all,
We are on our last night of boat printing and NEED HELPERS. So come on down, ASAP. Adam, Matt, and myself (Beth) are in ME 252 now and will hopefully be printing soon.
You should come down and help out. The boat is a thing of beauty.
~Beth
We are on our last night of boat printing and NEED HELPERS. So come on down, ASAP. Adam, Matt, and myself (Beth) are in ME 252 now and will hopefully be printing soon.
You should come down and help out. The boat is a thing of beauty.
~Beth
Wednesday, July 11, 2012
We've Begun
Following the success of Monday night's test print we only had one course of action: begin printing the boat. First we had to prepare for the print. We finalized boat dimensions, modeled the part in SolidWorks, countersunk hundreds of holes in the pegboard, and set up the build surface. We also decided to add a rheostat inline with the drill motor. This would give us the ability to control our extruder without reaching into the machine as it operated. Compared to our track record of hitting every wall imaginable it was a relatively uneventful afternoon.
During the mid-evening we generated stl files and sliced them. Because we were only going to get one shot at the print we needed to make sure the g-code was what it needed to be. After a dry run for final confirmation we broke for dinner. With our bellies filled we fastened the pegboard down and built a rheostat. We were ready to go.
Weeks ago we began joking about how our print would be super long, take a crew of people to make sure all was going well, and likely require working through the night. That joke is no longer a joke; it has become reality. Four of us operated the machine. We began printing at 11:00 pm and didn't finish the first layer until 3:15 am.
Our process took a short while to evolve, but we found a great way to make the print turn out beautifully. We ran the printer at 30% speed. Adam sat at the end of the machine and controlled the rheostat so that too much HDPE was not extruded during turns. Brandon stood near the windows to replenish the hopper, screw down the pegboard if it began to buckle, and any other task that needed to be done. Matt and myself sat on either side of the printer and were responsible for "clean up". When the extruder would lay a bead next to a cooled bead it would not fuse to the old one. In more technical terms: the fresh bead did not have enough thermal energy to melt the cooled adjacent one so would not fuse. To overcome this we supplied energy with a heat gun to bring the old bead up to a fuseable temperature. The finished pattern looks great.


Check out these videos of the print:
Big Red minutes after beginning - http://youtu.be/Ts0X4a9Rnsc
Cleaning up the turns - http://youtu.be/MwFBBZEMYGk
 We learned some valuable lessons during the print. For example, the pegboard will begin to buckle if it is not fastened down with enough screws. We either need to start with more or keep adding them on the fly like we were doing.

 Another is how to make turns look beautiful. You can see in the image how some of the turns near the bottom aren't as nice as the later ones. Our clean up process was a little trial and error at first. Though there wasn't much error involved. At least not as much as we've come to expect.
The other big lesson was that we can control the printer manually if the g-code fails, but you end up with a really bad looking print. That's what happened at the tip of the boat in the picture to the right. Of course it didn't help that our HDPE supply had been interrupted by a kink in the feed hose which lead to some bubbles.
We left for the night (more accurately the morning) being exhausted. Exhausted, but elated. We successfully printed our base layer. The last thing to do is print the walls. Our extruder is so loud that we need to do this sometime at night after the building is cleared. Even with the door closed the extruder can be heard in the mens room around the corner. Any pre-print tests should be done no earlier than 6 (to be courteous to the learning environment) and the actual print probably won't start until 9 at the earliest (because that's when parking is free). It will take several hours and requires a crew of at least 4 again (slightly different jobs but still as much labor as this print). If you'd like to be a part of this last stage get in touch with us and we'd be happy to put you to work. Email, comment, or just show up. We should be in the room after 10:45ish if you just want to drop by but if we're not it's because we are likely making a run to Scrap Blasters for more shredding. If you do lend a hand during the actual print respirators are optional (the fumes irritate some people, but we have decent ventilation). Hearing protection is strongly recommended.
Even if you can't offer several hours late in to the night feel free to come by and oggle if we're in the room. Thanks to everybody who's helped in any capacity at all. It's unlikely we'd be here without your contributions.
 |
| Our freshly printed base with out test piece to show scale |
Weeks ago we began joking about how our print would be super long, take a crew of people to make sure all was going well, and likely require working through the night. That joke is no longer a joke; it has become reality. Four of us operated the machine. We began printing at 11:00 pm and didn't finish the first layer until 3:15 am.
 |
| Adam, Matt, and Brandon stationed at their posts making this whole thing work |


Check out these videos of the print:
Big Red minutes after beginning - http://youtu.be/Ts0X4a9Rnsc
Cleaning up the turns - http://youtu.be/MwFBBZEMYGk
 We learned some valuable lessons during the print. For example, the pegboard will begin to buckle if it is not fastened down with enough screws. We either need to start with more or keep adding them on the fly like we were doing.
 Another is how to make turns look beautiful. You can see in the image how some of the turns near the bottom aren't as nice as the later ones. Our clean up process was a little trial and error at first. Though there wasn't much error involved. At least not as much as we've come to expect.
The other big lesson was that we can control the printer manually if the g-code fails, but you end up with a really bad looking print. That's what happened at the tip of the boat in the picture to the right. Of course it didn't help that our HDPE supply had been interrupted by a kink in the feed hose which lead to some bubbles.
We left for the night (more accurately the morning) being exhausted. Exhausted, but elated. We successfully printed our base layer. The last thing to do is print the walls. Our extruder is so loud that we need to do this sometime at night after the building is cleared. Even with the door closed the extruder can be heard in the mens room around the corner. Any pre-print tests should be done no earlier than 6 (to be courteous to the learning environment) and the actual print probably won't start until 9 at the earliest (because that's when parking is free). It will take several hours and requires a crew of at least 4 again (slightly different jobs but still as much labor as this print). If you'd like to be a part of this last stage get in touch with us and we'd be happy to put you to work. Email, comment, or just show up. We should be in the room after 10:45ish if you just want to drop by but if we're not it's because we are likely making a run to Scrap Blasters for more shredding. If you do lend a hand during the actual print respirators are optional (the fumes irritate some people, but we have decent ventilation). Hearing protection is strongly recommended.
Even if you can't offer several hours late in to the night feel free to come by and oggle if we're in the room. Thanks to everybody who's helped in any capacity at all. It's unlikely we'd be here without your contributions.
 |
| A thing of beauty |
Tuesday, July 10, 2012
Next Stop: A BOAT!
This is it! Seafair is this Saturday. After yesterday I'm positive we will make it (if only just barely). Yesterday was a "roller coaster day". You know, one of those days filled with emotion: discouragement, hope, despair, and triumph. The best part is that it ended on the triumphant note.
Being unsatisfied with our test pieces up to this point the day started out with us in the process of reconfiguring our extruder. We were encountering problems with what we believe was a back pressure issue. Our paranoia about getting the HDPE to stick to the build surface caused us to mash down on the first layer which would lead to pressure building up in the tip with nowhere to go except backwards. I've lost count of how many times we've had to change that thing but it's near a dozen by now. The good news is I think we got it this time. Making changes to the auger and barrel seems to have made our extrusion reliable which has always been the goal (elusive as that goal has been).
The first tragedy of the day struck during a test of the new extruder when the z-axis motor coupling failed. It simply gave up. As disheartening as that was, we got rid of the old coupling assembly and built our own with some aluminum stock, a couple of hacksaws, and the hope that we could make it work. While the new design looks slapped together (it sorta is) it gives us access to the coupling if needed with the added bonus of being extremely quiet.
With the machine now able to print something, we decided we needed to do a test print. Cubes, buckets, or anything else unboatlike were things of the past. We needed a quick small-scale test to prove to ourselves we could get the machine to do what it needed to do then move on to an actual boat. We pulled out some chalk and started drawing our what our final design would roughly look like. Who says sidewalk chalk is only for little kids?
We quickly modeled a small canoe, set up Big Red, plugged in three ventilation fans, ran a dry run, and prepped the surface. This was it: the moment of truth. Could we press go and let Big Red take over? The answer was no. Of course not. During our print of the base raft the extruder's drill motor began surging so Adam had to sit there with his finger on the trigger the entire time to deliver the appropriate amount of plastic while the computer operator tried to adjust the print speed on the fly. The sudden change in behavior of the drill motor was baffling. It was Adam though that suggested we reconfigure our extension cords so that the motor was not sharing an outlet with the ventilation fans. That did just the trick.
Without boring you with the nitty-gritty details, we tested a few variations of the G-code, layer thickness, and overall printing process. Looking at the layers tells a story of the individual lessons we learned as we were testing.
The fruit of our endeavors is a small-scale canoe which shows us that we can go large scale. What we will likely do during the big print is print the raft alone then feed the printer a separate set of G-code for the layers.
This will be a long print and it will take constant baby-sitting. During our test we had Brandon on the computer, Adam working the extruder, and me cleaning up any slop/refilling the hopper. Theoretically one person could run the print but it should have at least two. This "automated system" is not automated in the least!
Seafair is in 4 days. We have a verified process and about 70 pounds of HDPE. Stop on in sometime and check out what's going on. If you'd like to help during the printing process even better. Either catch up with us in MEB 252 or leave a reply to this post. We will utilize anyone who wants to lend a hand at this point.
I won't count my proverbial eggs before they hatch, but I think we got this. Let's show Seattle what UW students can accomplish in 2 months worth of free time and some recycled milk jugs.
Being unsatisfied with our test pieces up to this point the day started out with us in the process of reconfiguring our extruder. We were encountering problems with what we believe was a back pressure issue. Our paranoia about getting the HDPE to stick to the build surface caused us to mash down on the first layer which would lead to pressure building up in the tip with nowhere to go except backwards. I've lost count of how many times we've had to change that thing but it's near a dozen by now. The good news is I think we got it this time. Making changes to the auger and barrel seems to have made our extrusion reliable which has always been the goal (elusive as that goal has been).
 |
| Our new motor mount |
 |
| Using Brandon as a size reference |
We quickly modeled a small canoe, set up Big Red, plugged in three ventilation fans, ran a dry run, and prepped the surface. This was it: the moment of truth. Could we press go and let Big Red take over? The answer was no. Of course not. During our print of the base raft the extruder's drill motor began surging so Adam had to sit there with his finger on the trigger the entire time to deliver the appropriate amount of plastic while the computer operator tried to adjust the print speed on the fly. The sudden change in behavior of the drill motor was baffling. It was Adam though that suggested we reconfigure our extension cords so that the motor was not sharing an outlet with the ventilation fans. That did just the trick.
 |
Our test when we finished |
The fruit of our endeavors is a small-scale canoe which shows us that we can go large scale. What we will likely do during the big print is print the raft alone then feed the printer a separate set of G-code for the layers.
 |
| The pretty side |
 |
| The less pretty side |
I won't count my proverbial eggs before they hatch, but I think we got this. Let's show Seattle what UW students can accomplish in 2 months worth of free time and some recycled milk jugs.
 |
| Brandon thinking about his idea for "concrete skates". Just a little too small. |
Thursday, July 5, 2012
Multiple layers and warping solutions...
...Or, one step closer to being able to print a boat!


We've had a lot of issues with the HDPE not sticking to surfaces and peeling away, and a lot of ideas thrown around as a solution. On Wednesday, we tested printing on countersunk pegboard. The thought was that the plastic would get forced into the holes, and get mechanically anchored, thanks to the chamfer of the holes. We screwed the pegboard down to the print bed to try to minimize warping of the bed. Then the 5" test cube was loaded up, respirators put on, extruder and heating activated, and off we went!
To mash the plastic into the holes, we started off with a breakneck clip of 3 inches per minute. This spread our extruded layer out to nearly an inch thick. We modified our GCode to use a very sparse infill (we actually combined two different slicing configs) on the first layer to avoid unnecessary buildup.

Wonderful! Now up to the second layer and infill.


Looks good so far! And a pleasant surprise; HDPE bridges quite well naturally over gaps. But what about the perimeter? That's what everyone's going to see.

So maybe it's not the prettiest in the world, but at least it works, right?

Wrong. We had some issue with the extruder not being very consistent. It's visible both in the perimeter and the infill. But at least it's not a horrible flaw.

Hold on a second, that doesn't look like a cube! We ended up stopping the print here. This little square was almost exactly a thirty minute print. We'll have to try test printing shells of cubes. Solid shapes just take way too much time!

And, unfortunately, we got some warpage. The good news is that when we flipped the board over, the plastic had done exactly what we wanted and was anchored to the holes. We'd like to try printing with a raft included in the base layer, that way all the warping will happen to a part that is trimmed off.
Rumor has it that our layers are also starting to delaminate a little, but I haven't got any pictures of that so far.
Now for some numbers:
Feedrate = 30 in/min (100%)
Perimeter = 60-70% feedrate
Infill = 60-80% feedrate
Base = 10% feedrate
You may notice that these pictures are screenshotted from a video. I have the entire thirty minute print recorded, but I haven't uploaded it anywhere yet. If there is a huge demand for it I will put it up (It's a rather boring video, with a loud whirring sound the entire time), but otherwise we'll just put it in the archives, so to speak.
That's all for now! More updates as they come!
Subscribe to:
Posts (Atom)