Our very own Quinn was interviewed last week on WGWX's radio show Kid's Brain talking about her experiences building her Grawmet with us.
Check it out at:
http://wgxc.org/archives/5651
Good job Quinn!
Bethany
Saturday, December 29, 2012
Wednesday, December 26, 2012
Open work day Friday 12- 27- 2012
The room will be open Noon-5:00pm for those of you who are still in town. Need help building your bot, crimping, BLS connectors, wiring or flashing your board come in. We can get you up to speed. This includes any of you reprappers who may still be having trouble.
~Brandon B.
~Brandon B.
Friday, December 21, 2012
If your brainwave's got no brains, or your board is hiding from windows.
Come in and get your boards flashed, the Brainwaves can talk to both Mac and Windows, or just come in to work on the Build.
http://printrbot.com/wp-content/uploads/2012/04/Printrbot-Getting-Started-Guide2.pdf
or the individual links:
Pronterface http://koti.kapsi.fi/~kliment/printrun/
Slic3r http://slic3r.org/
Windows COM Port .INF Walkthrough.


Open Pronterface, make sure it connect and test the bots ability to move heat, call temps and extrude.
If you are still having trouble connecting to the board via Pronterface, restart the computer and try to connect to Pronterface again. If Pronterface still can't connect, right click "My Computer" select properties and make sure to check the hardware for COM# (click properties is set to the Baudrate to 115200, sometimes it will default to something silly like 9600.

Good Luck
~Bowman
 |
| Brainwave Board Wiring Diagram |
Requirements For Mac and Windows
1) Install Arduino 1.0.2
2) install the brainwave-arduino bundle from
https://github.com/
3) Download this branch of Marlin:
https://github.com/
https://github.com/
3) Download this branch of Marlin:
https://github.com/
The brainwave folder needs to be in Arduino right click it (control click for macs) for show package contents. Store brainwave folder in the hardware folder be sure to take the Brainwave file out of the first folder it has trouble seeing out side itself.
Walkthrough (Mac & Windows)
In Ardiuno 1.0.2 set your board. Tools => Board => Brainwave (see image).
Hook the board up to the computer with the tinyUSB press program.
In Tools => serial port the board should be recognized as a COM PORT# (PC) tty.usb modem131 (Mac) select that.
In the sketch open Marlin.pde (I stored this file in firmware in the Brainwave folder so I wouldn't lose it) this will be converted to Marlin.ino afterwards
Set Motherboard to 82 (found in Configuration.h)
Click Verify sketch (check mark symbol)
If there are no error messages
Click compile (arrow symbol)
It should write the firmware directly to your board. To confirm with open Pronterface set the Baudrate: 115200 and see if you can driver the bot around. Motors should spin heaters should warm up, and temperature readings should be accurate.
Pronterface & Slicer
If you haven't installed pronterface or slicer, you will need to. Printrbot.com has the best walkthrough (link below) I strongly suggest you read through the through entire PDF to ease the calibration. (I frequently reference pages 1 and 4 for beginners)
or the individual links:
Pronterface http://koti.kapsi.fi/~kliment/printrun/
Slic3r http://slic3r.org/
Never unplug a stepper motor when the board is on, otherwise you'll get a demo of how to replace a fried driver. (I stand corrected Mr. Wilson)
If you have a PC the COM PORT will disappear after the board has been flashed with the correct firmware. In the brainwave Arduino Folder there is a Brainwave.INF file this will allow you board to talk to computer as a COM PORT.
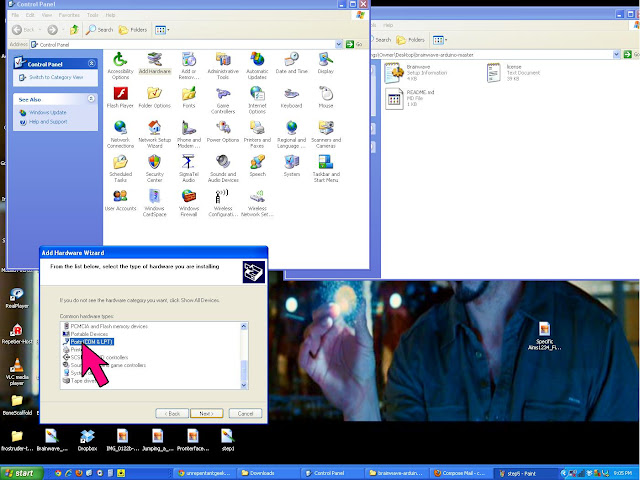
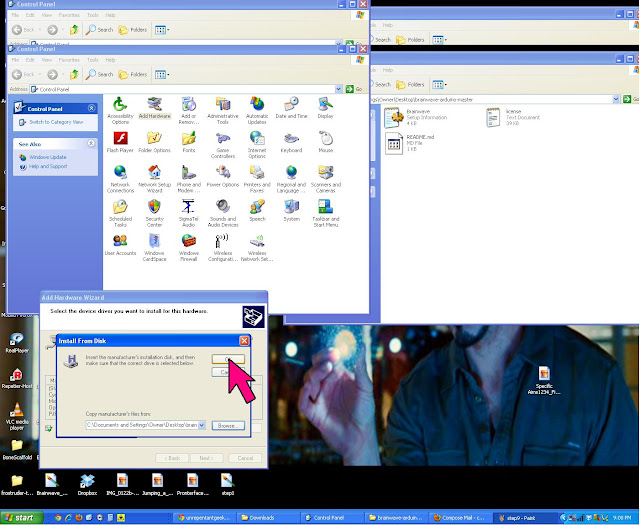
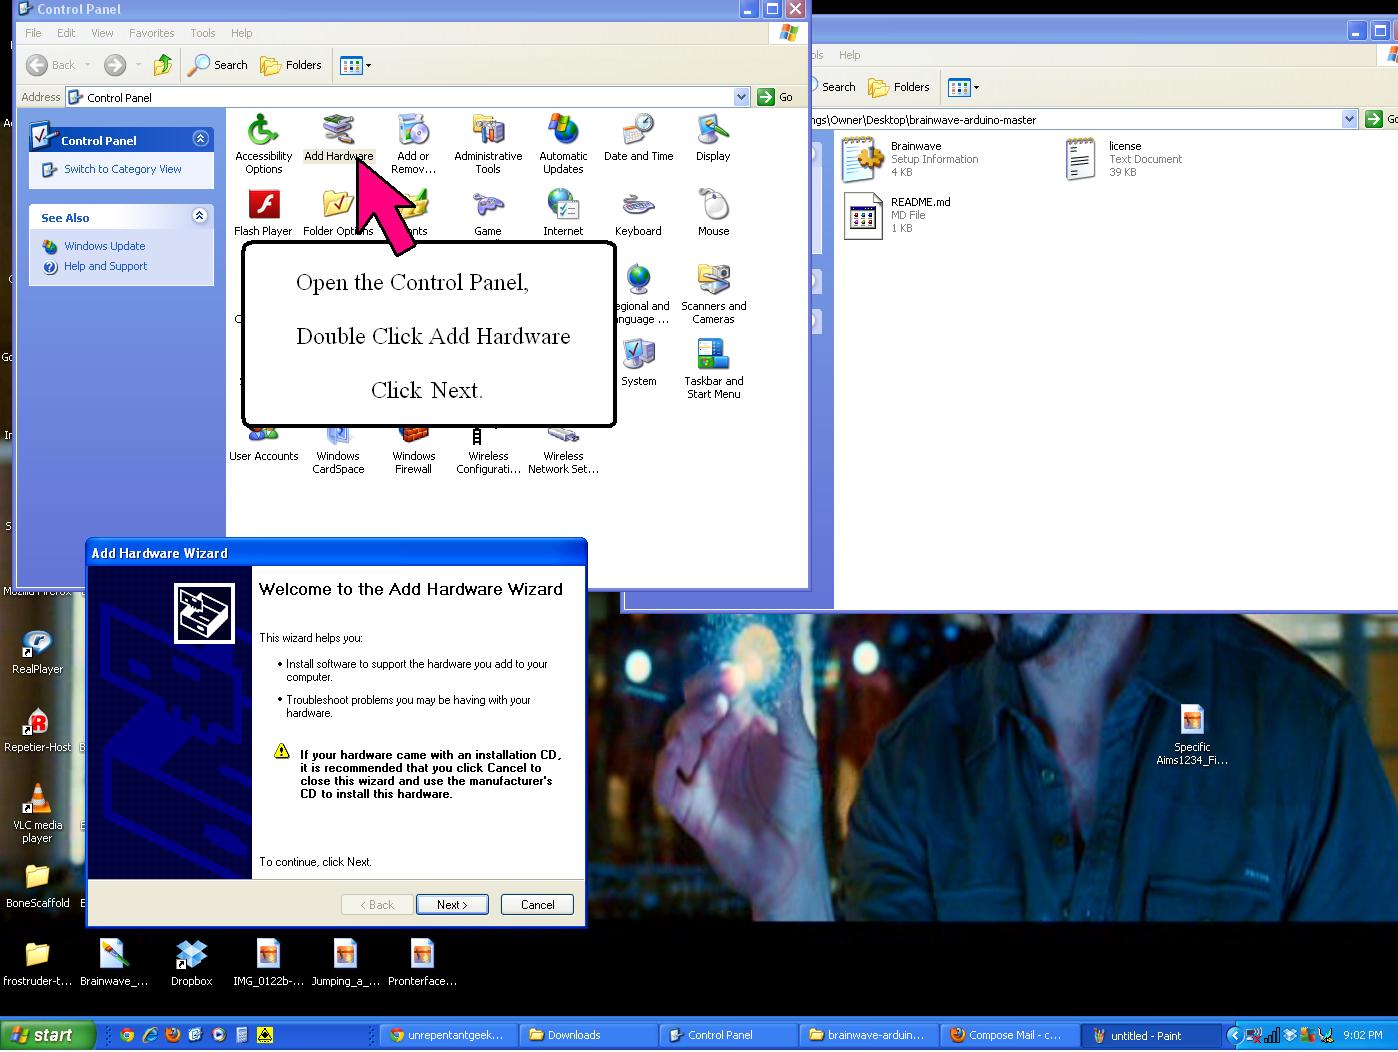
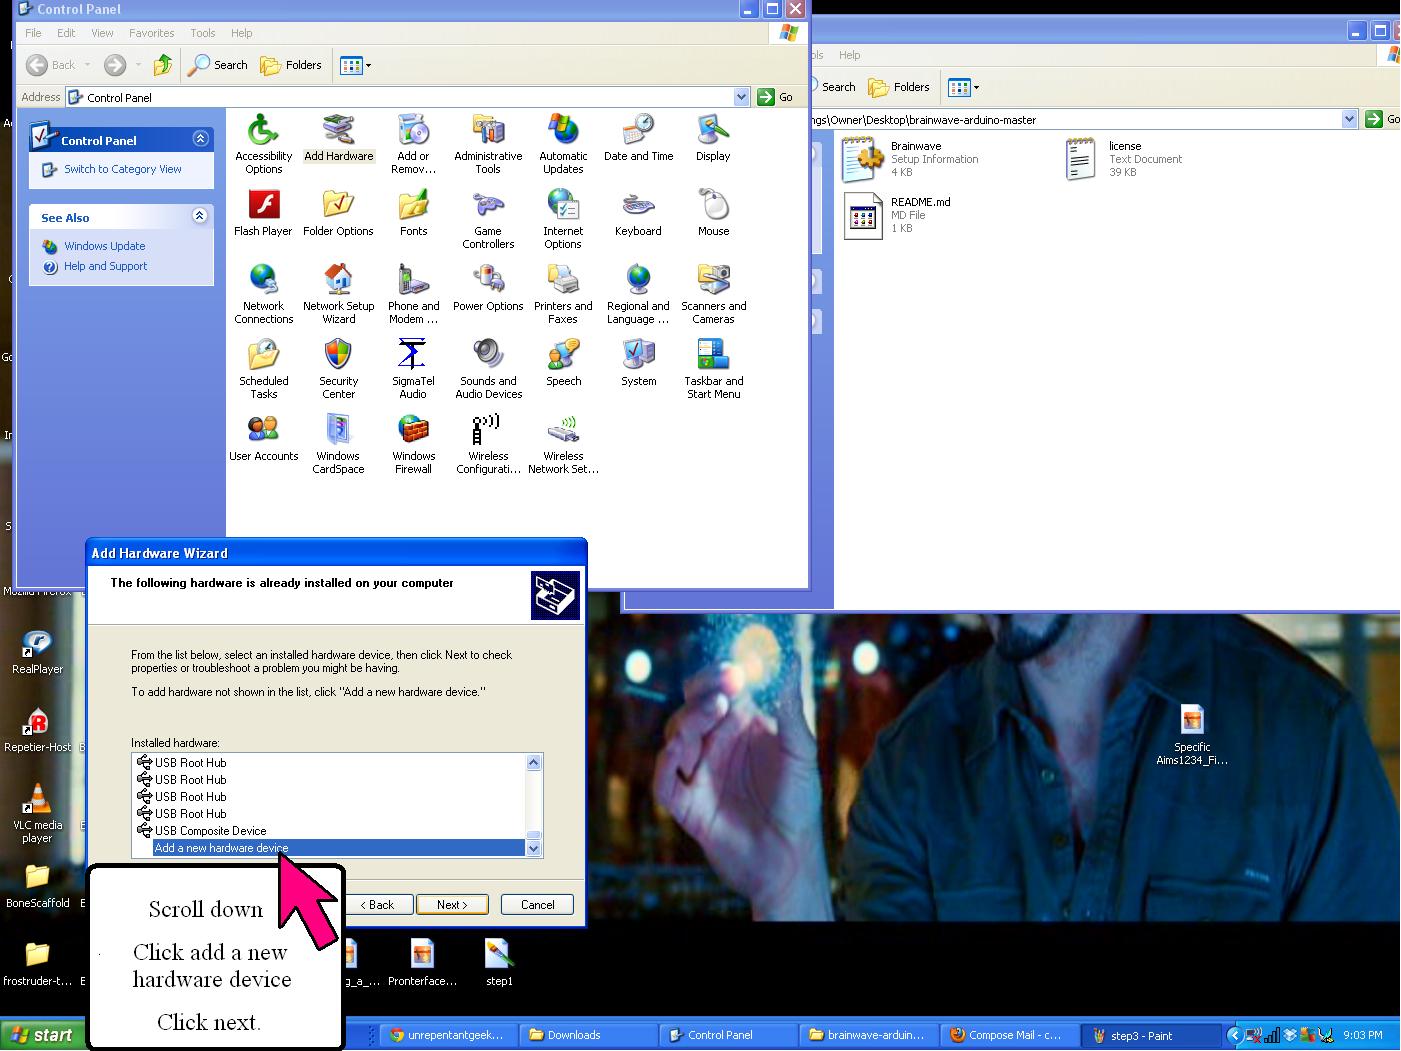
Windows COM Port .INF Walkthrough.
"How to find the Brainwave COM PORT in Windows XP (this also works for Windows 7)"


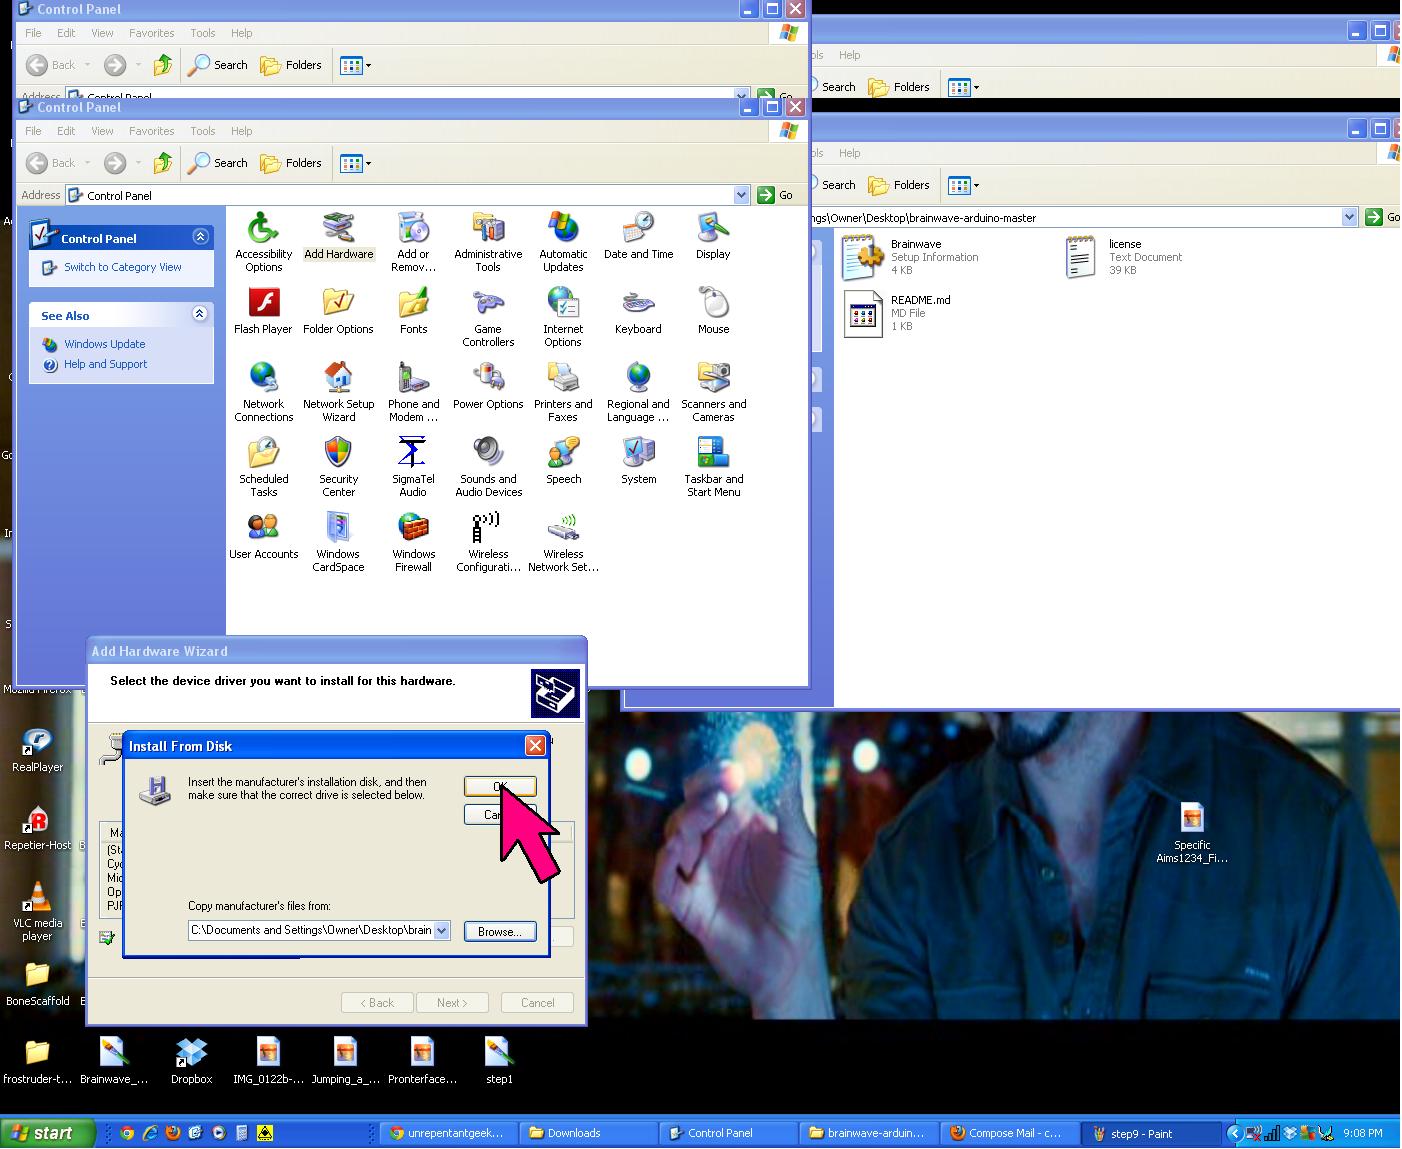


If you are still having trouble connecting to the board via Pronterface, restart the computer and try to connect to Pronterface again. If Pronterface still can't connect, right click "My Computer" select properties and make sure to check the hardware for COM# (click properties is set to the Baudrate to 115200, sometimes it will default to something silly like 9600.

Good Luck
~Bowman
Tuesday, December 18, 2012
Open Workshop this Friday (Dec 21)
Hey all,
The workshop will be open this Friday December 21: 12:00-5pm
~Bethany
The workshop will be open this Friday December 21: 12:00-5pm
~Bethany
Friday, December 14, 2012
No Open Workroom Today
This is just a reminder that there will be no open workroom hours today. So if you were planning a special trip into school just for that, stay home and enjoy some much deserved down time.
This probably doesn't affect too many of you, but it is likely that our open workshop hours will be modified for the duration of the break. As soon as the officers get that figured out we'll post it here.
Yours in Printing,
Mark
Friday, December 7, 2012
Workday Vote
The room will be open Noon to 5pm on Saturday. If you want a chance to get intensives, tutorials, troubleshooting, or unwind from studying on finals, I (Brandon B.) will be in there to help you with anything I can. Reprappers come in too if you are still having trouble.
Since I cannot be present for the build day this coming Friday, I am offering two days for builds. As always noon-5:00pm and pick a Monday or Wednesday
... and a Tuesday or Thursday.
Vote in comment section example Brandon B. Monday & Thursday.
Thursday seems to be definitive.
I will post the decision on Monday or Wednesday tonight @ 9:00pm
Ok so it is 10:30pm, and I veto Wednesday for Monday... because ,well, everyone but Ben can make it Thursday. Sorry Bing.
The WOOF room will be open for build days
Monday Dec 10th Noon -5:00pm
Thursday Dec 13th Noon -5:00pm
Hope to see your there,
~Brandon B.
Wednesday, December 5, 2012
Keep it clean, folks
With our recent influx of Grawmet orders, people have been excited to work on their 3D printers. Club members are free to use the workshop and our tools to help them with the Grawmet, Clonedel, or any other project you may have. Before one gains access to all of this, you must go through a safety briefing with one of WOOF's officers. One of the first things we go over in the briefing is cleanliness.
If you make a mess while working, you are expected to clean it up. You should always allot yourself 5-10 minutes at the end of a work session to tidy up your area. Some examples of tidying up include:
If you make a mess while working, you are expected to clean it up. You should always allot yourself 5-10 minutes at the end of a work session to tidy up your area. Some examples of tidying up include:
- Putting tools back
- Don't leave calipers, screwdrivers, etc. out on the table. Tools should be put back when you are done with the tool, not when you are done working. (This goes double for the calipers, they should be placed back into their case to avoid breaking them)
- If you take a drill bit off of the drill press or a hand drill, DO NOT place it on the table. It goes back in it's appropriate place immediately. This makes it easy to find the drill bit size that you want later. We have already lost 2-3 drill bits.
- Unplug and store power tools (This does not apply to stationary tools like the drill press). Dremels, heat guns, etc. should not be left out on the table, and should definitely not be left plugged in.
- Sweeping up shavings and trash
- If you use the sander or the drill press, please do a quick sweep at the end of your session. The dustpan should be next to the tool boxes. Otherwise, there is a huge mess at the end of the day that someone has to clean up.
- If you are using hand drills, please sweep up before you leave, or else these shavings just get in everyone else's way.
- Polyurethane dust is EXTREMELY slippery on cement floors, so, for safety's sake, don't just push your mess onto the ground. Always use a dustpan.
- Storing your items appropriately
- Once your Grawmet is assembled enough to not fit in your kit box, it should be stored out of the way. One great way to store your Grawmet is to rent a locker out in the hallway. It is totally secure, and you'll have access to it even if the workroom is closed and locked
Our workroom is often treated with surprise visits from faculty members, students, and many others. We would much rather everyone see a nice clean room full of 3D printers, rather than a dirty one. Please remember to clean up!
Subscribe to:
Posts (Atom)