 |
| Brainwave Board Wiring Diagram |
Requirements For Mac and Windows
1) Install Arduino 1.0.2
2) install the brainwave-arduino bundle from
https://github.com/
3) Download this branch of Marlin:
https://github.com/
https://github.com/
3) Download this branch of Marlin:
https://github.com/
The brainwave folder needs to be in Arduino right click it (control click for macs) for show package contents. Store brainwave folder in the hardware folder be sure to take the Brainwave file out of the first folder it has trouble seeing out side itself.
Walkthrough (Mac & Windows)
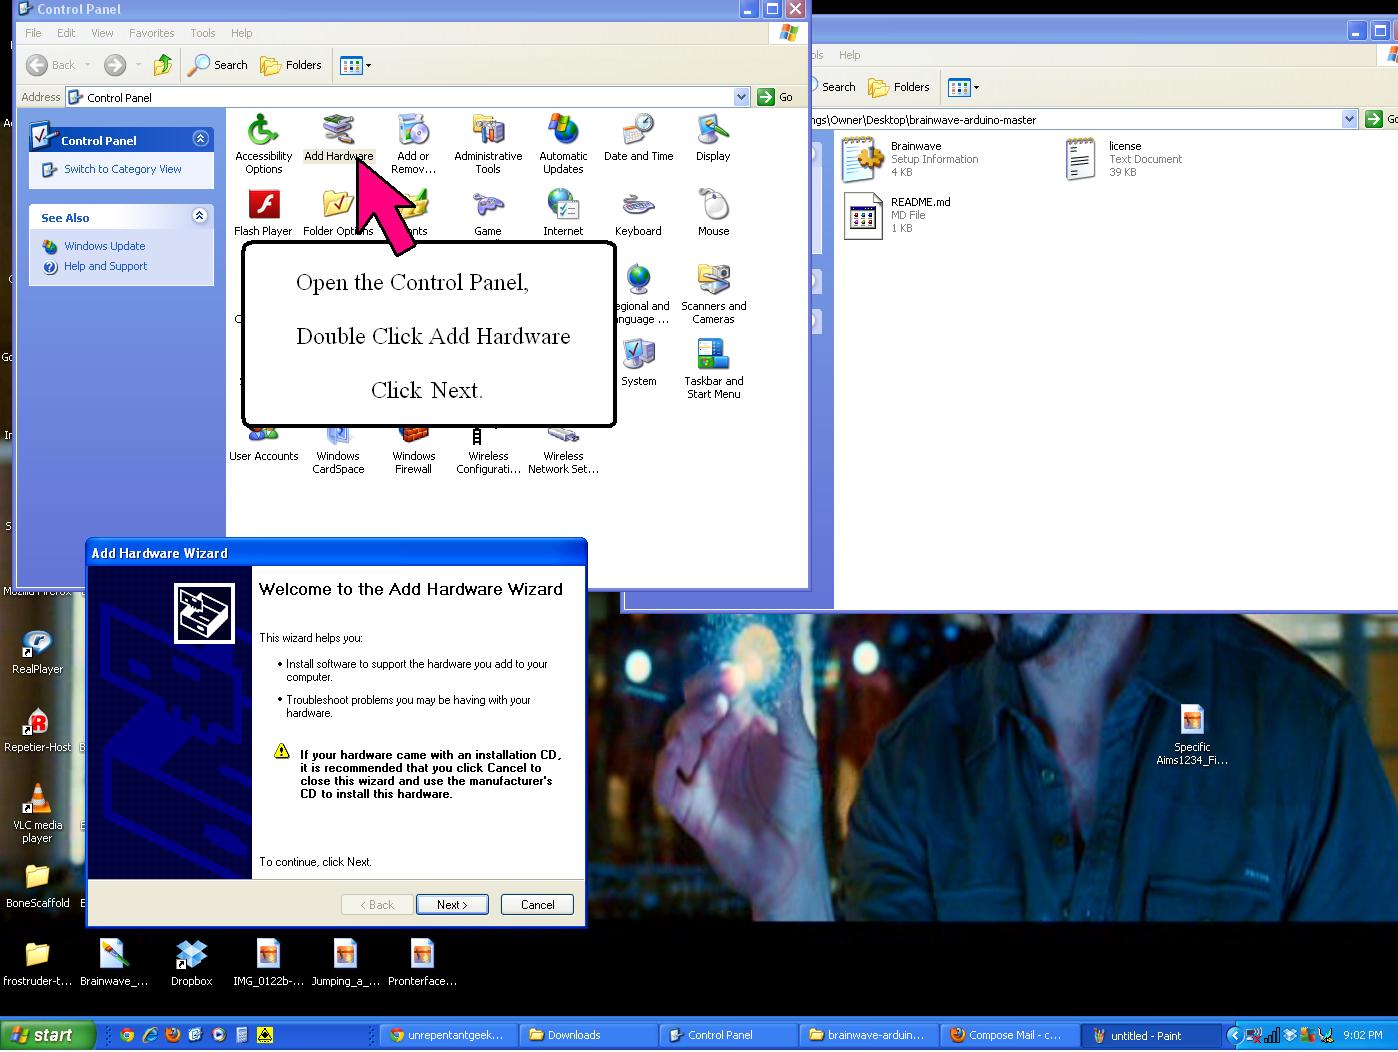
In Ardiuno 1.0.2 set your board. Tools => Board => Brainwave (see image).
Hook the board up to the computer with the tinyUSB press program.
In Tools => serial port the board should be recognized as a COM PORT# (PC) tty.usb modem131 (Mac) select that.
In the sketch open Marlin.pde (I stored this file in firmware in the Brainwave folder so I wouldn't lose it) this will be converted to Marlin.ino afterwards
Set Motherboard to 82 (found in Configuration.h)
Click Verify sketch (check mark symbol)
If there are no error messages
Click compile (arrow symbol)
It should write the firmware directly to your board. To confirm with open Pronterface set the Baudrate: 115200 and see if you can driver the bot around. Motors should spin heaters should warm up, and temperature readings should be accurate.
Pronterface & Slicer
If you haven't installed pronterface or slicer, you will need to. Printrbot.com has the best walkthrough (link below) I strongly suggest you read through the through entire PDF to ease the calibration. (I frequently reference pages 1 and 4 for beginners)
or the individual links:
Pronterface http://koti.kapsi.fi/~kliment/printrun/
Slic3r http://slic3r.org/
Never unplug a stepper motor when the board is on, otherwise you'll get a demo of how to replace a fried driver. (I stand corrected Mr. Wilson)
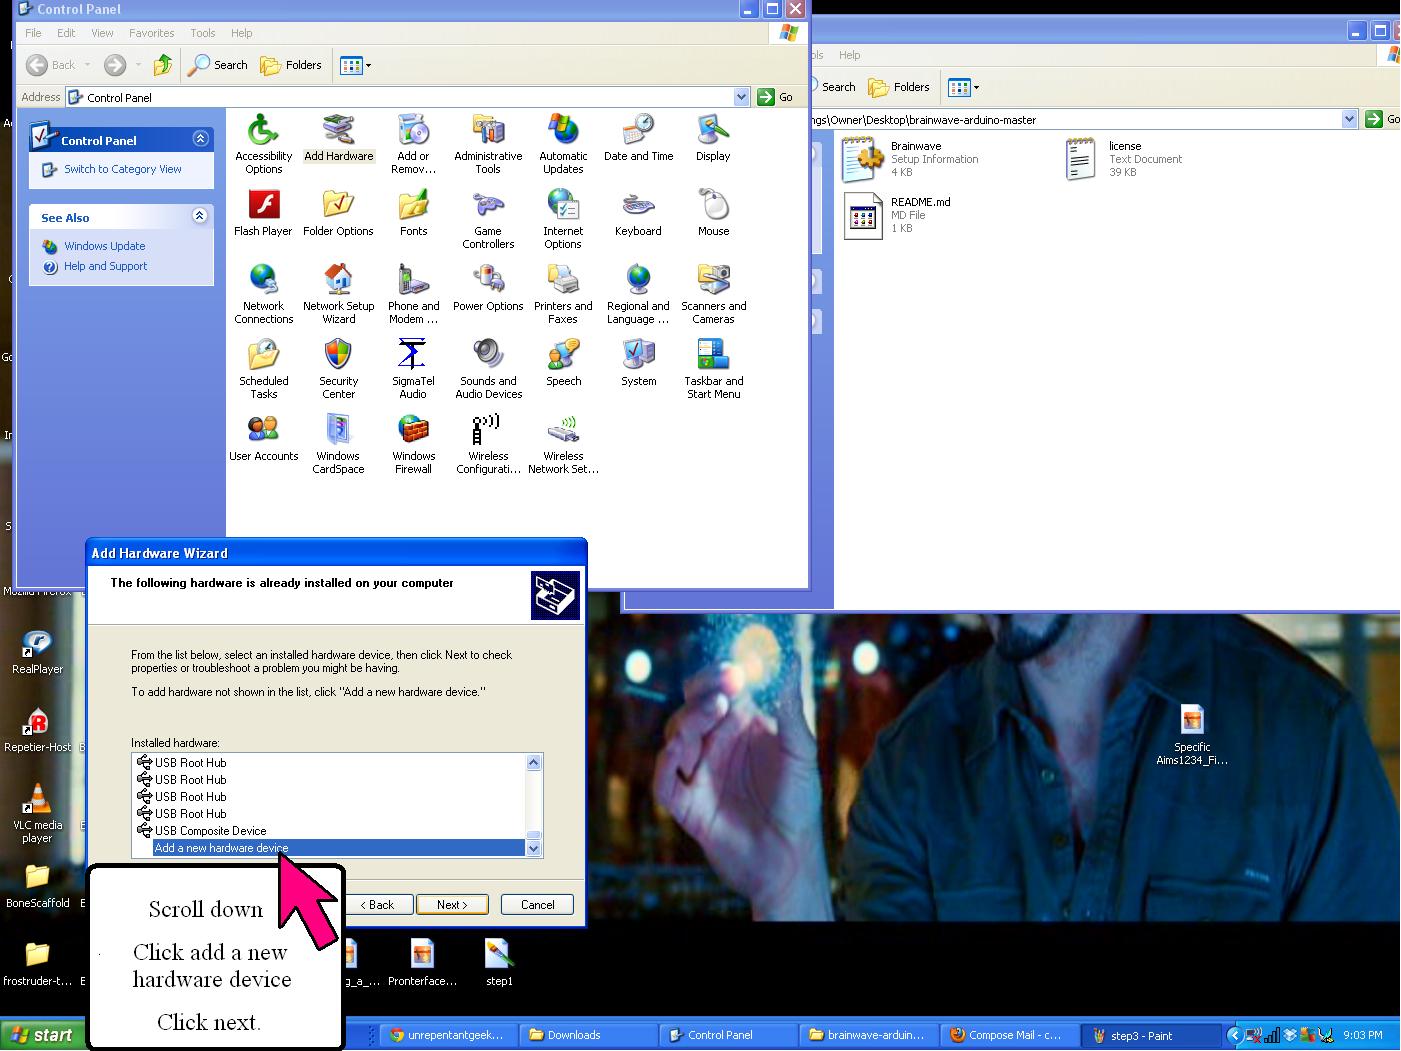
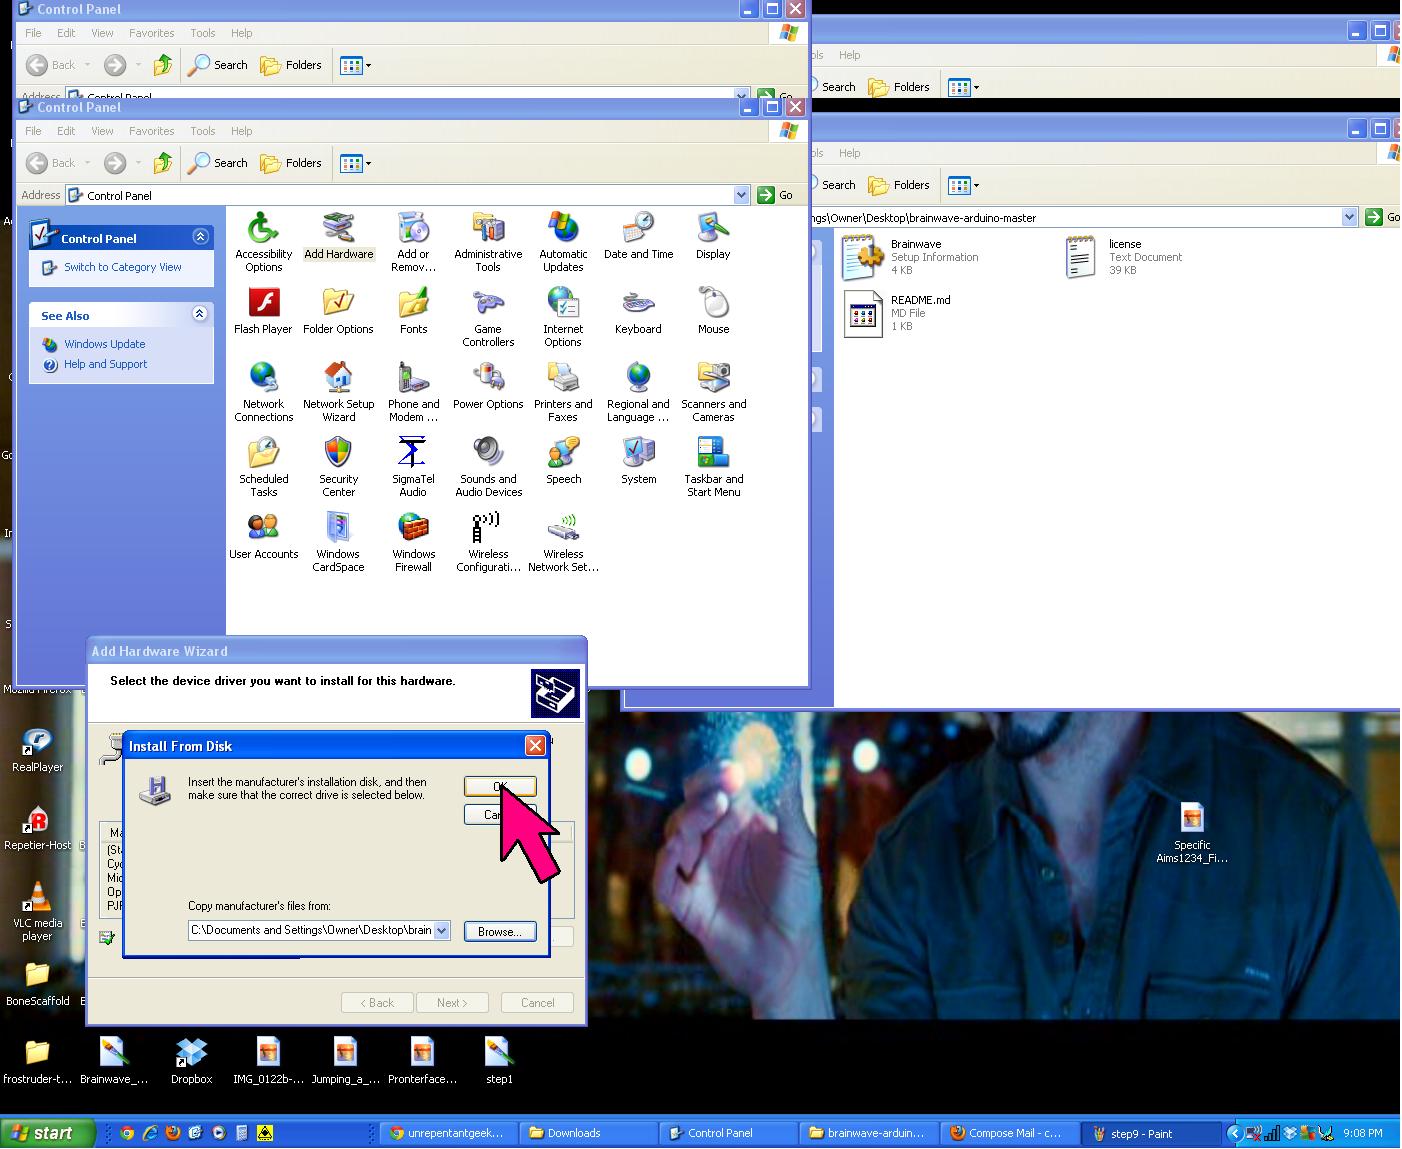
If you have a PC the COM PORT will disappear after the board has been flashed with the correct firmware. In the brainwave Arduino Folder there is a Brainwave.INF file this will allow you board to talk to computer as a COM PORT.
Windows COM Port .INF Walkthrough.
"How to find the Brainwave COM PORT in Windows XP (this also works for Windows 7)"


If you are still having trouble connecting to the board via Pronterface, restart the computer and try to connect to Pronterface again. If Pronterface still can't connect, right click "My Computer" select properties and make sure to check the hardware for COM# (click properties is set to the Baudrate to 115200, sometimes it will default to something silly like 9600.

Good Luck
~Bowman
This comment has been removed by the author.
ReplyDeleteHi. I really need help with this board. I am going to buy this board soon but the only problem is I can't figure out all the software stuff. I have downloaded the latest version of arduino and slic3r on my Mac which is currently running OSX Snow Leopard 10.6.8. I know i'm suppose to install this 'Marlin' thing onto the board and some brainwave arduino thing into arduino but i can't even figure out how to use github. The arduino-brainwave file on github is super confusing. I don't know which one to copy because it says Windows driver. Then for Marlin all there is on the site is same like the arduino-brainwave thing. All just a bunch of files. I also don't know how to install pronterface. Finally, I can't find my 'Hardware' directory in arduino. I am currently running arduino 1.0.4.
ReplyDeleteAny help is appreciated. Many thanks.
Old message. Have you sorted it out? On the Mac you have to right-click on the Arduino.app in Finder and choose "Show Package Contents" to reveal the application bundle. Drill down to Contents/Resources/Java/hardware and drop the 'brainwave' folder there. You can download the 'brainwave' folder at the arduino-brainwave GitHub as a ZIP file. You have to use a 1.0.x version of Arduino.app, later ones don't work with that bundle. Once you have the 'brainwave' folder in there, restart Arduino. You should see 'Brainwave' in the Tools > Board submenu.
DeletePronterface can be downloaded pre-built from http://reprap.org/wiki/Printrun#Mac_OS_X so there's nothing complicated there.
The next steps get slightly more involved. You have to open the Marlin project (Marlin.ino or Marlin.pde) in Arduino, then edit the Configuration.h file. The RepRap wiki and forums are very helpful for that part. Josef Prusa's RepRap Calculator is also very useful.
Your best option, if you're on 10.6, is to go to 10.7 or 10.8. But if that's not possible, Python installation instructions for Snow Leopard are on the Printrun GitHub and searching forums.reprap.org might also turn some help with that.
DeleteThis comment has been removed by the author.
ReplyDeleteSeem like this board need to connect to the 12v power before you can program it, is that true?
ReplyDeleteYes. And you have to press a Program button as well. I just hold the Program button and tap Reset to get it into mode.
DeleteAfter following the instructions above under winXP, my brainwave 1.0 board shows up as COM5 with a question mark next to it. The information says "The device cannot start (Code 10)". Because of that, I can't upload Marlin - that COM port isn't listed in Arduino. Is there something else I need to do?
ReplyDeleteAh, always nice to answer my own question.
DeleteWhen I press the program button, windows detects "AVR CDC bootloader". I had to follow the basic manual driver installation process as described above for the Brainwave device, but this time for the "AVR CDC bootloader", who's .inf file can be found in the brainwave/firmwares/LUFA directory of the brainwave arduino hardware bundle.
Once that was done, I had another COM port, COM6, which I could upload Marlin to.
Nicely draw, the information on your blog is extremely relevant to my search.
ReplyDeleteOutstanding way to deliver the information with the diagrams. Thanks for the best post
ReplyDeleteDo plumbing problems exist in your company or at your house? You only need to look at Pro Fixer Dubai! Having more than 15 years of expertise, we take great satisfaction in providing reliable local plumbing services supported by a licenced workforce.
ReplyDeleteBathtub repair dubai
Emergency plumber in dubai
water heater repair
Water pump repair